Friday, September 21, 2012

I will never buy ice cream again!

Guess what's been sitting in my Amazon shopping cart for MONTHS? Nope it's not my sanity! HA, give up?  I've been drooling over an ice cream maker.  In fact a Cuisinart ice cream maker. I try to rationalize how it would make sense to actually buy it. I'm not one for machines that only do one thing. Also we have an electric ice cream maker sitting in a box in our garage. But it's kind of a pain to use.   I also debated about the kitchenAid ice cream maker since I already have the mixer and Sister Bacon raves about hers.  Oh the decisions.  One thing I knew for sure is that I would love to make more homemade ice cream. If you've never had it you are missing out. There is nothing better than that first dip of silky soft ice cream. I also like I can control what goes in it.

So the ice cream maker debate continued on, should I get it? Should I wait for Christmas or a birthday present? Should I just dig out the one from the garage and struggle to make it more often with the machine we have? Oh the decisions!  Many days I just ignore it sitting in my amazon cart.  That was until the one day I stopped by a garage sale this summer.  And guess what was staring at me, yes my ice cream machine. And it was BRAND NEW in the box for $8!  Shocked to say the least I snatched that box and wouldn't let go.  I'm pretty sure there would have been a fight if anyone even came near me to ask what was in the box!  For $8 this thing was coming home with me and I have to say I love it.  I'm glad I waited to get a good deal on it but if I knew how easy it would be to make homemade ice cream I would have splurged sooner and bought one!

So if you are like me and have been wondering if you should get one or not, don't hold back!  You won't be disappointed at all. 

Since it was new it still have all the paper work with it and the kids and I thumbed though all the recipes too. We decided our first try at it was going to be just basic vanilla with some extras to add in. 
Here is the basic Vanilla recipe my machine calls for. This recipe will work with any ice cream maker that has a 1.5 qt bowl capacity.

Vanilla ice cream
1 cup cold whole milk
3/4 cup sugar
2 cups heavy cream
1-2 teaspoons vanilla to taste

that's it! How awesome is 4 ingredient ice cream? You can substitute lower fat's in this recipe. This first time we made it we used half and half instead of heavy cream and skim milk instead of whole.  I also have decreased my sugar to 1/2 cup instead and the kids (or Mr. Bacon for that matter) have noticed a difference.

Mix the milk and sugar in a large bowl until the sugar is dissolved, then add in the cream and vanilla. Stir until everything is mixed well.  Pour the liquid into your ice cream bowl, add what every parts your machine says and turn the thing on!  Can you see the kids had a blast watching it go around!

Even Bacon Bit needed to take a look!

Around and around it goes!  It can be a bit noisy but no more so than the kids!  The process takes about 25- 30 minutes to get ice cream.  While it was mixing we decided to crush up a pack of m&m's to mix into the ice cream. We added about 3/4 cup of them during the last 5 minutes of making ice cream.  
Let me tell you it was AMAZING! So much the kids and I ate it all for dessert that night! Yes we did save a small bowl for Mr. Bacon too.  But the next day we decided we should make a second batch just to make sure it still tasted good. Right? Ok so use what ever excuse you want, once you have homemade ice cream you'll want it every day!


This time while it was mixing up we decided to chop up some Reese's peanut butter cups. 
 Again about 3/4 of a cup full.  And add them during the last 5 minutes of mixing the ice cream.


Mixing, mixing, mixing... done!
Delicious homemade ice cream. Yes this tasted just like a DQ blizzard only better! We really do enjoy our ice cream maker, my only regret was not getting it sooner!

Tuesday, September 18, 2012

Woof Woof! Bacon Bit's Birthday

Someone told Bacon Bit he could grow up. I'm not sure who but didn't he read the book on being the youngest baby? He can't grow up so fast!  This past weekend Bacon Bit turned 2. Hard to believe my baby is a toddler and running all over.  Thankfully the terrible two's haven't set in yet.  Although I think I remember the three's being worse than two with the other kids.  Regardless if he followed my directions or not on growing up, we had yet another birthday to plan and that includes another cake! 

Lately Bacon Bit's interests have changes like our weather here, one day it's Bob the Builder, the next it's Diego.  Thankfully one thing has stayed the same, his love for his puppy!  This is Puppy, a well loved blankie I made him before he was born. So well loved I need to repair it again. But puppy goes everywhere with him.  So I thought that would be my inspiration for his birthday cake. After all this is probably the last one I get to pick out, next year he'll be telling me what cake he would like to make.  I love making the kids birthday cakes. Not only is it cheaper, it's fun to watch how their interests change over the year with what they want.  So off I went to find ideas on puppy cakes.

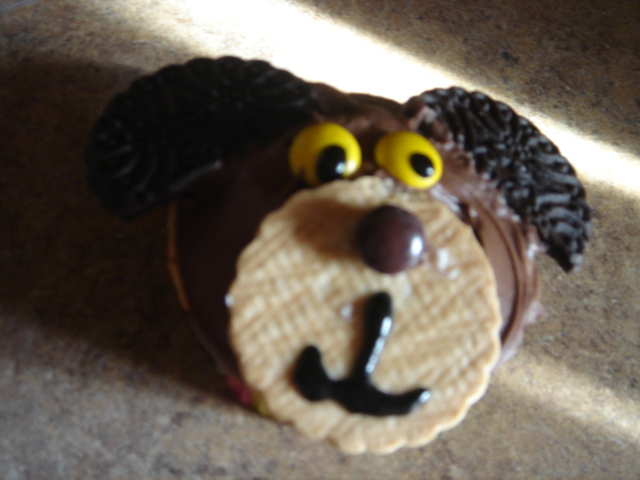
I found some inspiration on the Internet for some puppy cupcakes.  A quick trip though the pantry and then off to the store to find some supplies that would work and we were all set to go!  Here is what you need to make these cute puppies yourself:

Cupcakes- homemade recipe or from a box, just bake them up!
Then I took some of these vanilla and chocolate cookies for the face. Twist them apart and use a knife to scrap off the cream filling. Yes the kids loved that I was doing this. They happily volunteered to eat the cookie insides! 

 Next you need to dig out some of these candy pieces for the eyes and nose.  I used yellow for eyes and brown noses. These are Reses' pieces because I had them laying around. M&M or any other candies would work too.  If you don't have candies just frosting works too. 
 Then I mixed up a very small batch of black frosting and put in in a baggie with a piping tip. 
  Now it's time to assemble the cookies.  First take your cream-less cookies and break about a third of the black cookies off to make the ears.  Keep the vanilla one's whole as this will be for puppy's face.
 
 Next is all about placement. Frost your cupcake. I tinted my frosting brown for this, but pink puppies would be cute too!  Then place the vanilla cookie on the bottom of the frosted cupcake. Add the eyes and use frosting to secure on the nose.  then I added the ears to the top.  Finally I took my black frosting to make eyes and a mouth. There you have it! Aren't they just cute!

  WOOF WOOF WOOF!  A whole bunch of puppies! 
 
 Add a few candles for the birthday boy and we are set!
HAPPY BIRTHDAY BACON BIT!

Thursday, September 13, 2012

It's like eating chocolate clouds!


The other day Sister Bacon was up for a visit! I love it when I get to see my siblings because it's not all that often it happens. And the kids loved seeing Auntie Bacon as well.  While she was here I decided to try out a new 'fluff' recipe I found to see if it was good. You know when it's best time to try experimental recipes on your guests right?

 "Here try some of this. If you're still doing good in 5 minutes I'll try some too!"

Normally I try things out first but this one turned out good anyway.  And it's super easy.  The next night I was looking for a quick dessert for the kids and thought I'd whip up some of these pudding fluff cups for them! 

I love this recipe because it's super easy and fast. The kids love it because they can help make it and it tastes awesome! Even Little Boy Bacon said "Mom this tastes just like eating chocolate clouds!"  Man I love that kid!

Here's what you need:

Pudding fluff:
1 box instant pudding- any flavor and any size
1/2 the milk required on box to mix up the pudding
same amount of whip cream as milk. (you can use store bought or mix your own from heavy cream)

Take the pudding and milk and mix together.  If you are using a small box of pudding and it calls for 2 cups of milk, you want to use half the amount or one cup.  If you are using a big box of pudding and it calls for 3 cups milk, you want to use 1.5 cups ect.  Mix those up good. The kids can help with this part. 

 Once it's mixed together, you want to take your whipped cream and fold it in.  Use the same amount of whipped cream as you did milk.  Gently fold, do not mix this or you'll lose the fluffiness.  I usually do this part because none of the kids have figured out what I mean by folding yet. When I said I had to fold the whipped cream in Little boy Bacon asked if it was like folding the towels he as to do for chores!  Someday they'll be expert cooks, until then I'll do the food folding. 

 There you have the pudding fluff! You can do lots of things with this now. Sister Bacon and I just ate it by the spoon full! YUM!  You can add in things like crushed up cookies, mini chocolate chips, M&M's, or other candies.  You can use it as a dip. Some vanilla pudding would make a great fruit dip!  You can even use it to frost a cake with.  Just make sure to store the cake in the fridge once it's frosted.

I decided to crush up some graham crackers I had laying around. 


I put a few scoops into the bottom of a cute dessert cup.  Added a big scoop of the pudding fluff on top and added a dollop of whipped cream I had leftover from the mix.  This was such a huge hit with the kids they even asked for seconds!


Wednesday, September 5, 2012

It's a good thing this isn't a health food blog!

 Because I wouldn't have been able to post these AMAZING brownies.  We had some company coming over Labor day so I asked the kids what treats we should make.  They all said we should try something new.  I have a list of new recipes I'd like to try and the kids picked these brownies out.  I have to say it was a winner! Good enough that I had to share with all of you.  These would be the perfect snack for the kids as they get off the bus.  Oh how I'm ready for back to school. I know many of my readers have sent their kids off to school already but here in Minnesota we always start after Labor day.  And this year it's not until Thursday!  Lucky for me I have enough time to whip up another batch of these bars before then!

Peanut butter layer brownies
1- 9x13 pan brownies baked- go ahead use your own mix or a box!
1/4 cup butter
1/2 cup peanut butter
1/2 cup sugar
1 cup brown sugar
1/2 cup milk
1 Tbsp vanilla extract
2 cups flour
1.5 cups of your favorite add in (mini Reese's pieces, M&M's, mini chocolate chips, crushed cookies ect)

First bake up your pan of brownies and let them completely cool.  That seems pretty easy right?!

Next place your softened butter and peanut butter in a bowl and mix.  You can do this by hand too, I just toss it in my handy mixer. 
 Toss in your sugars and mix for a minute or two until it's fluffy.  
Then it's time to add the milk and vanilla.   
 Once those are creamed together, it's time to add in your flour and mix.  It should be nice and thick now like cookie dough. Go ahead and give it a try!  YUM right?!  Oh and this is safe to eat just like this since there is no raw eggs.  Yes I'm thinking of making this as a mommy treat too when the kids go to school sans brownies!  Perhaps even freeze them in little balls and leave in the freezer for when I need something sweet.

Once all of that is mixed up it's time to add in the goodies, about a cup to cup and a half of them! I choose these fun mini Reese's pieces in cute fall colors. I love fall and I'm ready for it to be here! Mix what ever add in you choose with the rest of the peanut butter dough. 
Then take the dough and press it on top of the brownies.  Give it a good pat down to make sure the 2 layers will stick together.  No need to bake, just slice them up.  Don't they look good?  They will amaze you.  Oh and yes they are quite rich. I cut a few bars this size below and I had to go back and make them smaller yet. Even Little Miss Bacon who is all sweet tooth said they were too big and sweet for her at first!  Enjoy your bars, let me know if you made them for after school snack and how it went!


Tuesday, August 28, 2012

It's a fun word to say and keeps the kids busy

We are in our final days of summer for the Bacon kids.  School starts back up next week. I'm not sure what Bacon Bit will think of the empty and quiet house. I'm pretty sure he'll miss his playmates.  But since this is the last week before school starts, I think the kids have kicked up the 'I'm bored' a lot more.  It was time for a fun science experiment.  Thankfully it requires very little to wow the kids and it kept them busy for quite a while!  Digging though the pantry I found a box of cornstarch. I never really used this stuff in baking but for some reason there sat a box in my pantry.  Having remembered a recipe from when the kids were in  ECFE I decided to show them the fun of Ooblek. What you say? Surly you've heard of ooblek? No. Well learn along with us. The kids were just fascinated by the name of this stuff, but I told the to wait until they saw what it does!

First you need to start off with equal cornstarch and water.  And a big bowl to mix it up in.  Now if you want to make fun colors I suggest putting a drop of two of food coloring into the water before mixing.  Pour both water and cornstarch in the bowl and start mixing.  The goal is to mix it until it runs off the spoon easy. Clumpy like the green stuff here needs a little more water. Add small amounts until you get a runny consistency like the pink stuff below.


Now the fun part, go ahead, knock on it. Cool hun? It's hard.

Now rest your fingers just on the top of it and watch them magically sink in.

The kids were in awe!  They had a lot of fun. Bacon Jr. had fun getting it to stick to his hand and picking up the bowl.
Little Miss Bacon had fun watching it drip off her fingers.
Even Bacon bit had a bowl to play in. It was a great activity to do on one of those 'I'm bored' days.  Or rainy days or days you just want to be the cool mom!
And you can add a lid and save it for fun the next day too! I did find that it only lasts a few days though before it starts to smell and go bad but the kids can have fun while it lasts!

Monday, August 13, 2012

Birthday Busy

 It was that time of the year again, both Bacon Jr. and Little Boy Bacon's birthdays come 4 days apart from each other in July. That means a lot of cake at the Bacon house!  This year since we've been so busy I actually thought about buying their cake from the store bakery.  That was until I glanced at the prices, $19.99!! I about fell over right there. I promptly headed for the baking aisle instead.  Bacon Jr wanted a Lego star wars cake this year.  Gosh these kids keep me on my toes with ways to wow them with my very armature cake decorating skills!  But I try to not disappoint them.  I found an idea a while back how to copy characters right from a coloring book page with frosting onto cakes that I thought I'd give it a try for this challenge.  First find our character, Bacon Jr. wanted Jedi Luke for his cake. I quickly scanned a copy with my computer scanner and got started. If it was just from a coloring book I wouldn't have scanned it, I would have just used the page but we couldn't even find a free online color picture he liked so we choose one from his book.

 Next I whipped up some homemade frosting.  Then I grabbed a Ziploc type baggie and inserted my cake tip to the inside, snipped the bag and added the other tip pieces and viola! instant disposable cake decorating baggie.  These work great for small amounts of frosting. Trust me I've tried it to decorate sugar cookies with lots of frosting and all I got was busted bag seems!  Ahh... it's the little tips that save others headache!
  Then take some wax paper and place it over your color sheet.  I taped mine to the sheet to make sure it wouldn't move as I frosted it.
Then I took one color and outlined the picture. It's a good tip to remember when you are doing this that the frosting you put on first will be the top layer of the design when you lay it on the cake. Also this will be a mirror image when it's on the cake if you're ok with that!

 Then take a new color and add that to the picture.  I filled in the body with black, mixed up some peach for the face and hand, yellow for the hair and a nice green light saber.  Normally after I outline I would have made sure to put the face on before filling in over the top, however I was working with a picture that was only 3.5 inches in size. I do not recommend this!  It was very hard to do, but that was the size I needed for the cake. The bigger the picture, the easier it is to make the fine details on it. 
   Now that my Luke was complete it was time for him to 'chill out' in the freezer for a while. I left it in there for about an hour just because I was busy decoration the house. I'm sure 15 minutes would have been enough. 
While it's in the freezer it's a great time to frost the cake too!
 Now it's time to take out your frozen character. You can lift off the wax paper and tada! Magic right?

 Gently flip your frosting image over and place it on your cake where you'd like it. Then gently peel the wax paper away. 

 There you have it! A very happy birthday boy! I finished making the face by using edible pens. Ok so the pen isn't edible but the 'ink' is. YUMMY and FUN!


 And no I didn't forget about Little Boy Jr.'s birthday cake either, his was a bit less complicated.  All he wanted was a bobber cake!  He loves fish and fishing even more.  I took two 1 quart bowls and baked my cake in there, bake a small ramekin too and assemble and frost! He loved his special cake too!
 Now what is the best way to end the perfect birthday when your a kid? With a campfire you got to help build of course! Complete with blue and green flames thanks to Grandma Bacon!  Whew, it's over and I was an exhausted mama, but I had two very happy boys and two awesome birthday cakes for very little money!