Showing posts with label chicken. Show all posts

Monday, January 14, 2013

Thanksgiving leftovers in January

I love making extra food to save.  It's one mess and several meals.  This past Thanksgiving I made a turkey with all the fixings.  We had several leftover days and a few turkey sandwiches from it but there was still turkey leftover so I tossed it in my foodsaver and froze it for another day.  Yesterday I rummaged though the freezer and the pack of turkey crossed my path and it was my inspiration for dinner.  What to do with turkey? Make thanksgiving dinner again right.  However I hate making a lot of dishes, especially in this house.  We don't have a dishwasher so I try to limit how many dishes I use.  So how do you make Thanksgiving dinner in one pan, read on!

What you need for thanksgiving dinner in a pan:

Turkey- I used about 5 cups or 1.5lbs worth I'd guess. It's what I froze.
Potatoes- for making mashed potatoes
Green Beans- one frozen bag or 2 cups worth
Stuffing- use your own homemade or pre-made box
Gravy
Shredded cheese

First peel and dice your potatoes, I used 5 medium/large potatoes.  Put them in a pot of water on the stove to boil.  Many of you have made mashed potatoes for years, but there are a few cooks out there learning, I'll walk you though how I make mine.

 Cover them and place them on med heat. Let them boil for about 10-15 minutes or until the potatoes are soft.  While those are boiling it's a great time to make up the gravy.
Take about 1.5 cups of chicken broth and place them in a skillet.  Turn it on and let it come to a boil.

In a 2 cup measuring cup place 3/4 cups of water and 1/4 cup flour and mix well.  Pour that into your boiling broth very carefully. 

Stir constantly with a whisk until thickened.  If it's too thick, don't worry just add a bit more water until you get gravy consistency.  Oh and don't forget to add some salt & pepper to it too! About 1/4 tsp of each is what I add.  

Now that the gravy is ready to go, it's time to mash the potatoes.  Drain the potatoes and place them back in the kettle.  

I add in about 1/2 cup milk, 1/3 cup of plain Greek yogurt or sour cream depending on what I have on hand, 2-3 tbsp butter and 1/4 tsp salt.  Mash them up with a potato masher or mixer.  It's that easy!

Now it time to assemble our dinner.  In a 9x13 greased pan, place your stuffing. I used a box mix I had on hand.  I also added the 2 cups of water the box called for.
Now take your turkey and lay it on top of the stuffing. I cut mine into smaller pieces before laying it on top.  If you don't have leftover turkey, no problem. Cooked chicken works for this as well, use about 1-1.5lbs of chicken for the recipe.
Next layer is green beans. I tossed mine on frozen.  Then pour your gravy over the beans.


Last step is take the mashed potatoes and spread them over the top of it all.  I tossed a handful of shredded cheese on top too because everything is better with a little cheese right?! 
 Now its time for the oven.  Bake at 350 degrees for an hour.  It's that easy.  This would also be a great way to use up those thanksgiving leftover when you have them too.  You could even prepare this ahead of time in a freezer safe pan and place heavy duty tin foil over it and toss it into the freezer for another day.  That's great for when you are just sick of eating leftovers from turkey day but don't want to waste them!  

After it's hour in the oven it's ready for the table!  Only thing missing from this Thanksgiving in January is the biscuits, cranberry sauce and extended family members!


Thursday, November 10, 2011

Feels like Fall outside

Do you ever notice how your meals change with the season?  At least they do for us. Perhaps that's because we have four seasons in Minnesota.  In the summer we stick to more light meals, grilling, and salads.  But in winter its the food that makes you feel all warm and cozy inside.  This meal is defiantly one of those!  I've been asked by a few readers for this recipe since it was on our last meal plan.  It's super easy to make and reminds me of thanksgiving.  You have to try it.

Chicken Supreme:
1lb chicken breast cut up
2- small packages roast beef sandwich meat (like buddig or store brand)
1 can cream of chicken soup
1 cup water
2 cups shredded cheese (your choice, I use co-jack, swiss, provolone, I like to mix it up sometimes!)
1 box stove top stuffing


First preheat the oven to 350*.  Grease a 9x13 pan generously and set aside.  Open up the two packages of roast beef meat and cut into small squares.  Sprinkles these all over the bottom of the pan you just greased.  Next layer on the cut up chicken. 


Now for the next layer (aren't layers fun?! Ok so Ma Bacon may be a little over tired here. We've had a busy start to November with Mr. Bacon's birthday and Little Miss Bacon's birthday back to back.  Oh and keep watching, I will be posting our fun frugal birthday party we had for Little Miss Bacon too!).  Take your shredded cheese and sprinkle it over the chicken.  I used co-jack for this dinner. I also happened to have a few slices of swiss cheese left over in the fridge that needed to be used up.  So I broke them up and placed them on top.  You don't need to add more cheese unless you are like me and was born in the great cheese state of Wisconsin! (GO PACKERS!)  Yes we eat a lot of cheese at our house.

Now in a small bowl add your soup and water.  Mix it well. 
Take the soup mix and pour it over the cheese.  See I told you this would be easy to make!
Next take your box of stuffing (no need for it to be name brand, it was just what I had in the pantry) and dump it in the bowl you used for the soup mix.  If you'd like you can rinse the bowl first, I don't mind getting messy though.  Add in the recommended amount of HOT water but no butter according to the box.  I just use hot water from the tap since ours comes out so hot.  You don't need to boil the water first at all. Just mix the stuffing with warm water in the bowl. Sometimes I even use my hands for this step.


Sprinkle the stuffing over the top.  Now it's all ready for the oven.  Bake at 350* for 1 hour. 

That's it, when it's done let it cool a few minutes before serving.  I make some of the corn we froze and homemade buns to go with this.  Amazing diner without the thanksgiving work! 

Wednesday, November 2, 2011

Who needs Olive Garden?

Mr. Bacon and I love Italian food.  One of our favorite places to go is Olive Garden.  We use to go there a lot in our pre-kid days.  When Bacon Jr was little it was one of his favorite places to go, we even had a full cupboard of Olive Garden kids cups!  But there is no way I want to attempt to take 4 kids out there now, and I couldn't imagine the cost of that bill!  Those were also the days before we learned how much we wasted money on things we 'though' we needed.  I'm happy to have those days behind us!  I love Chicken Alfredo. It's one of my favorite things to eat.  So I was very happy when I found this recipe!  Want some amazing Italian food without the restaurant price and hassle?  I thought so! 

Chicken Alfredo:
1 lb chicken breast- cut up
2 cups broccoli - thawed or raw cut into small pieces
3/4 box fettuchini noodles

Sauce:
1 stick butter
1-8oz cream cheese (low fat is ok!)
2 tsp chopped garlic (I use heaping tsp but we like garlic)
2 cups milk
6oz grated Parmesan cheese
1/8 tsp pepper

First get your water boiling for your noodles, cook them according to the package. Now you want to get the sauce going.  I use a small pot for this.  Add the butter, cream cheese and garlic to the pot.  Set on the stove on low heat and allow it to melt.  You don't want this to be cooked on high heat or it will burn.  Once that is melted it will look quite lumpy, don't panic it's suppose to be like that.  I use a whisk to mix it good.  Then slowly add in the milk while mixing.  This will smooth out the lumps into a creamy sauce!  Add in the pepper and cheese and allow it to cook on low or med low heat.  The Parmesan cheese takes some time to melt down so I like to start this right away and let it warm on low heat while I cook everything else. 

Next take your cut chicken and saute it in 1-2 TBSP oil and your favorite seasoning. I use Mrs. Dash garlic and herb for this recipe. 
When the chicken has been cooking for about 5 min on med heat, add the broccoli to it.  This will cook it but hopefully not make it too mushy. Continue cooking for another 5-10 minutes until the chicken is fully cooked.  I was going to take a picture of this.  But as you can see we were a little busy. Sister in law Bacon was here to play with the kids and we decided to make some fun cookies!
When the noodles are tender, drain them.
When the chicken is cooked, add the Alfredo sauce to the chicken. 
Next take the biscuits out of the oven.  Yes you can't have chicken Alfredo without some biscuits or bread sticks!  Remember this recipe?!
Now find a big dish.  I used a 9x13 pan.  This pictures looks like it's going to over flow, but don;'t worry, I made a batch and a half when I cooked this time. 
Ahhh... savor the aroma.  I love this stuff so much it's making my mouth water for some. Too bad we dont' have any leftovers anymore.  You have successfully made an amazing Italian meal at home for a fraction of the cost of going out to eat.  And you don't have to be embarrassed about how you kids act while you eat it!  Enjoy!

Tuesday, August 16, 2011

It's just BIG chicken!

"I want chicken nuggets for dinner!"  Ever heard that one before? If not you must not have kids.  In my quest for what to make the kids for dinner one night I was begged and begged for chicken nuggets.  I finally gave in under one stipulation, I was making them from scratch.  Oh the moans and groans I got!  "No I want the one's in the freezer that we buy at the store." Miss Bacon exclaimed rather loudly.  I explained to her those chicken nuggets were just treats that we got sometimes.  But I did make her a promise mine would taste just like them, only bigger. She agree but not before telling me she wouldn't eat them if they didn't taste the same. Nothing like setting standards!  

I took 1 pound of chicken tenders and got to work!
Here is what else you'll need:
2 eggs
1/2 cup or so of flour
1 cup or so bread crumbs- I had a box of panko on hand, and I do say they make good breadcrumbs. Normally I just make my own from the butts of the bread.
favorite seasonings- I kept it simple with some salt and pepper

First take a baking sheet and spray with cooking spray. Then place each flour, bread crumbs and seasonings, and beaten eggs in separate bowls. 


Now it's time to get messy.  First take your chicken breast and cut it to desired size.  If you truly want nuggets, just cut the chicken smaller. You may need more breadcrumbs since there will be more to coat so keep the box handy.

Dip the chicken in flour.
Then dip it in the egg wash.
And roll it in the bread crumbs. 
Place the coated chicken on your baking sheet.  I baked mine at 350* for 25 minutes since I had bigger chicken tenders.  Cook them until the insides are white and no juice runs out.  I did flip mine at the half way point as well. 
And there you have it, homemade chicken nuggets.  The kids LOVED them.  Miss Bacon exclaimed "Mom, it's just BIG chicken!" and she ate almost 2 of them.  Even Bacon big had his share of chicken nuggets that night.  We paired these with some fries and fresh fruit.  It was an easy dinner for us.  These can also be frozen and heated in the microwave for quick lunches.  I did that with the leftovers and Bacon Bit has been one happy camper! 

Sunday, June 26, 2011

How cute is mini pie?

 Well I have officially turned another year older today, or 29 again right?!  Either way I had a great day and celebrated with my family.  And to end the night I thought I'd share another great recipe that I whipped up this week.  (I have lots on my camera.... I realized looking for these pictures I have quite a few posts I'm behind on! So you'll be hearing lots from me!)
Mr. Bacon is working some crazy hours lately and needs some yummy cooking to help him get though his shifts.  What better comfort food than Chicken pot pie!  And everything tastes better when it's mini right?  So I made up some mini chicken pot pies for his lunches.  I can't guarantee how many he'll get right now though, Bacon Jr. found them and started gobbling them up too!  Yes they are a hit around here, I'm so glad I made a double batch!
So what do we need to get started?
Chicken pot pie:
1 lb chicken breast - cubed
1/4 cup Italian dressing
4 oz cream cheese
2 tbsp flour
1/2 cup chicken broth
1 package or about 2 cups frozen mixed veggies
 
Heat your oven to 375*.  Place cubed chicken in pan with 1 tbsp oil and season it with your favorite seasoning. I used Mrs. Dash Garlic & Herb again.  While that is starting to cook, I make sure my veggies are thawed by running them under some warm water and letting them drain.  I also got my broth going. This time all I had in the house was the cube kind in the cupboard. Hey whatever works right?! 


Now go check on that chicken.  After it's been cooking for about 5 minutes, it's time to add in the cream cheese (remember in my pics I was making a double batch.  If you follow the recipe above you won't use as much as I do in my pictures!)  I do cube up the cream cheese before I add it in. It will help it melt faster. 


 Stir the cream cheese in until it's all melted.  It will look nice and creamy- see!

 Now it's time to add in the flour.  Mix it around well. It will make the chicken mix thick. 
 Once the flour is mixed in, add in the veggies and the broth.  Let this simmer for about 10 minutes now. That was a simmer, so make sure you turned down the dial on the stove!  Yea, you learn from mistakes right?
 
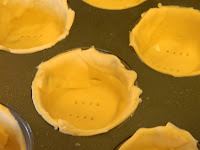
 Now it's time to get the dough prepared.  I had started to use refrigerator dough. I had a package left in the freezer and knew it would work well for this.  It didn't go far.  I had to make up a batch of homemade dough using Grandma bacon's recipe above.  And I'm glad I did- homemade tastes so much better!  Take the dough and roll it out to about 1/4 inch thick.  Then I just kinda tore off chunks of it and mushed it into my well greased (YES WELL GREASED! There I put it big enough so hopefully every one's potpie comes out when it's done baking!) muffin tin.  It's ok if some over lap and  it' doesn't look pretty. It will still taste good. I trimmed off the excess around the top. In hind sight, I wish I would have left a bit overhang so I could press it together when I put on the tops.  Hey you have to learn from the mistakes you make, thankfully for you, I've already make them! Once you get your dough pressed into all the cups, take a fork and poke a few holes in the bottom.  This will help the dough stay put. 
Now it's time to fill the cups!

So now for the tops.  I had wondered how I would make cute little circular tops for the potpie.  So I started to measure round things around my kitchen. See no need for fancy gadgets!  The cups I tried were all too big, the donut cutter was too small, then I happened to find a caning jar ring and it was just right. (I promise there will be no bears looking for their porridge in this story!)  I rolled out more dough and cut circles from it. Then I smooshed them on the top. I tried to squish it to the bottom crust dough as much as I could. This is where it would have been nice if I had left a bit extra overhang.  Oh well, learned for next time.   Now that the tops are on, you need to poke vent holes in them, I take a sharp knife and slit in 2 holes on each top. 
 
 And now they are ready for the oven.  I baked mine at 375* for 18-20 minutes until the tops are golden brown.  

 Here they are out of the oven, yes you notice the mess I made.  They cooked over and out everywhere.  It's ok they still are fine!  But again if I had left some overhang from the bottom crust to secure the tops better I could have prevented this. 


Once they are out of the pan, they look cute and delicious and no one will ever know the difference!  I placed them on a baking sheet and put them right into the freezer. Well the one's that haven't been eaten anyway.  Once they were frozen I packaged them by two's in food saver bags so they will stay fresh, you can place them in ziplocs type baggies or wrap in foil or freezer paper too. 

Don't they look delicious!  Now you see why they are not lasting around here!
 
I had thought about making pies in a jar, but I didn't have enough energy left in the day, or pie filling in the house! So I decided to make homemade pop tarts!


  Again using my caning jar ring I cut out circles and placed them on a cookie sheet. 
 
 Added a spoonful of my homemade strawberry jam to each one, and topped them off with another circle of dough.  
 Then crimped the edges with a fork. Press hard enough to seal them, not just make cute designs around the edges. 
 All ready for the oven. I baked these in the 375* oven for about 8-10 minutes until golden brown.
 Cooled them on wire racks.
  
 I made up a quick powder sugar, milk and almond extract frosting to drizzle over the top.  Add some food coloring for fun colors... and
 
 TADA! Pop tarts made with love!  The kids were so excited for these.  They didn't last until breakfast, every last one was gone by dinner time!