Showing posts with label muffins. Show all posts

Sunday, January 15, 2012

Never be afraid to fail!

Yesterday I decided to not leave the kitchen. Ok that's not entirely  true, I did get out side and shovel the snow that fell but otherwise I dedicated yesterday to a baking day.  I was tired of the kids complaining about having to have cereal 'AGAIN'?! (insert whiny kid sounds here).  I knew I wanted to make some danish puff since I happened to have 4 dozen eggs in the fridge, but I wanted to stock the freezer too and decided to make muffins. Lots of muffins! 

Mr. Bacon always loves the apple pie muffins so those went on the list.  I even added some walnuts to them! I was craving the yummy 2 ingredient pumpkin muffins.  But I have some extra time still and decided to make one more kind.  Digging though my recipes didn't spark any thing I just had to have, however digging though the pantry sparked my creative side!  I thought of how easy those pumpkin muffins were to make, just cake mix and a can of pumpkin.  Then I wondered if it was that easy with other mixes.  I happened to have a carrot cake mix on the shelf.  And a bazillion containers of applesauce baby food left over from Bacon Bit that needed to get used up. No I had no clue going into this if it would work.  But hey that's how great cooks are made.  There is a deal of science when it comes to making food, however there is always a space to be creative too.  Some of our favorite meals were one's we put together on our own like our curly chicken and peas and our lemon garlic chicken!  They are family favorites.  If we never experimented around, we would never have found them. So with my cake mix and applesauce in hand I headed to the kitchen. 


I dumped the cake mix and 2 cups applesauce in my mixer and away it went. I was surprised how it turned out.  In the bowl it wasn't thicker and dense like the pumpkin muffins mix. It was light and airy.  I honestly was a bit worried about how they 'd turn out.  I scooped them into mini muffin pans and baked them in a pre-heated 350* oven for about 16 minutes.  Took them out of the pan and let them cool on a rack, all but one. Nope I couldn't even wait for them to cool down to try them. I popped one in and they were amazing!  No heavy dense taste like the pumpkin muffin, just light delicious.  Success! 

 I happened to find a container of cream cheese frosting in the pantry as well when I was digging in there and though it would make the perfect topping to these muffins.  Yes it defeats the purpose of making 'healthier' muffins with just applesauce, but it's better than having made the cake according to the box and then putting the frosting on right?  They were a huge hit with all of us here and with Mr. Bacon's co-workers how happily sample my kitchen creations.  Ok the good one's anyway! 

 And to show not all my ideas turn out well, here was a flop!  I made a gallon of yogurt yesterday as well. I pulled out one of the gallons of milk I froze in the freezer back in August.  I had no idea if frozen milk would work for yogurt since I hadn't tried it yet.  It seemed like a good day to try. And Little Miss Bacon has been asking for some 'mommy yogurt' too.  I followed my recipe and filled three quart jars with vanilla yogurt.  Earlier in the day I took out a bag of frozen strawberries, yup the ones from the garden I packaged earlier, they've been wonderful to have all winter long.  I drained the strawberries saving the juice in a separate bowl (the berries went into a banana strawberry smoothie Bacon Bit and I shared).  With the yogurt left after filling the other jars, I added the strawberry juice.  I had thought it would make wonderful strawberry yogurt that Little Boy Bacon would like, he's not entirely hooked on just vanilla regardless of what I add in it.  Well I could tell from the moment I filled the last jar it would be a flop.  Straining the yogurt left a lot of chunky parts.


 I decided to give it a go anyway, at least it looked pretty!  I incubated the yogurt for 8.5hrs. and as soon as it came out of the water I knew it was a disaster!  The strawberry yogurt separated out completely.
 
  And I had no idea if it was good or not so my monster who lives in my garbage disposal ate it!  (yes the kids think there is a monster that lives inside our garbage disposal who eats all our scraps).  So that experiment didn't work, you can't win them all. However I did learn that using milk that was frozen for months in the freezer works great to make yogurt.  The other three quarts turned out just fine.  You win some, you lose some, but never give up trying!

Saturday, October 8, 2011

Is it a pancake or a muffin?

Yet another morning of the 'what are we having for breakfast' debate with the Bacon kids.  One thing I've learned is that none of my kids like cereal!  So the big question today....are we having muffins or pancakes for breakfast?  I replied... BOTH!  Yes I did get shocked and stunned faces, along with a moan (Little Boy Bacon wanted waffles, no I just can't win around here, and I'm not a short order cook!)  But when I mentioned there were chocolate chips involved everyone seemed happy with that answer. 

I found this recipe a while ago on a site I love called Bakerella.  Goodness she has some amazing, yummy looking stuff.  Much I can't make due to the fact I have 4 kids and a husband to take care of.  Many of her recipes involve a lot of detail.  Someday perhaps I'll have time to dawdle in the kitchen, but for now I have 4 hungry mouths to feed.  This recipe was one that wasn't time consuming though.  I have made it before and the muffins don't last in this house.  So give them a try, I bet your family will fall in love with them too!

Maple pancake muffins:
1 cup flour
1 tsp baking powder
1/2 tsp baking soda
1/4 tsp salt
2 tsp sugar
2/3 cup buttermilk (or sour milk)
1 egg
2 tbsp maple syrup
2 tbsp melted butter
1/2 cup chocolate chips

In a bowl mix in the first 5 ingredients.  I dump them all in and then take a fork to stir them around.  Set this bowl aside. Now normally I don't use two separate bowls. I'd just mix the wet ingredients and then dump in the dry.  Yes I like to save on how many dishes I need to wash!  But I have found when I make muffins that this is a needed step.  It helps keep the muffins more airy. 

In the next bowl combine the butter milk (you can make sour milk by adding 1 tbsp vinegar to 1 cup milk and letting it sit for a few minutes, it will work the same as buttermilk)  egg, syrup and melted butter.  Mix these well.  Then dump this mixture into your flour mixture.
 Stir just until everything is combined. This is another great tip when making muffins.  Don't over mix your muffin batter or anything you add to it (like chocolate chips, nuts, berries ect) will fall to the bottom and you won't get fluffy muffins.  It's ok to have lumps in the batter, they are suppose to be there! 
 Once it's just mixed, it's time to dump in these!  I think it's every kids dream to eat chocolate for breakfast!  Little Miss Bacon requests these muffins all the time for this very reason!  Gently mix the chocolate chips in the batter, a few turns of the spoon is all you need.  Again you don't want to over mix.

Next place them in your well greased mini muffin tin.
  Save some extra chocolate chips and add them to the tops!
  Bake in a pre-heated 350* oven for about 10 minutes or until the tops are golden brown.  Be careful not to over bake them.  Since they really are pancake batter it won't take as long to bake as normal mini muffins. 
 Here they are!  Let them cool a few minutes on a wire rack.  Enjoy the smell! Ahhhh...
And bat off little fingers trying to eat them.  They need to cool!
 Ooey, gooey, yumminess!  I like them best when they are still a bit warm and the chocolate is still melted a bit.  They taste delicious when they are all cooled too which makes them great for an after school snack too!
Don't want chocolate for breakfast? No problem!! You can leave them out. They taste like pancakes.  Oh and don't forget the syrup!
 Go ahead and bake up a batch for breakfast! 

Tuesday, September 27, 2011

It can't be that simple, can it?

Fall is my favorite season. I love the cool weather, the changing colors of the leaves, the baked goods....
Especially anything with pumpkin.  Why is it that we save the yummy pumpkin treats just for fall?  I was in the mood to bake morning. 

 Not long ago I came across a recipe for pumpkin muffins that required only 2 ingredients.  I thought this can't work can it?  But I had to try it.  Mr. Bacon was going to visit some old friends and I wanted to send something with so I decided today was the day to give this pumpkin muffin recipe a shot.  And just in case it didn't turn out, I made a batch of pumpkin spice cookies to go along with it!

Simple Pumpkin Muffins
1 spice cake mix
1 - 15 oz can pumpkin puree (not pie filling)

Yes that's all you need! 

Dump the cake mix into a bowl.  Add the can of pumpkin puree.  Don't add anything else to it. I love this there are no eggs, oil or anything.  Just cake mix and pumpkin. 

Mix it up good either with your mixer or a good ol' spoon.


Fill up your paper lined or greased muffin tins about 2/3 of the way full of batter.
Oh another benefit to this recipe, you can lick the bowl clean!!

 Bake your mini muffins in a preheated oven at 350* for 15-18 minutes or until they spring back when touched.  If you are making big muffins, bake for 20-25 minutes. 
 
 Fresh out of the oven. They smell amazing!!
 Let them cool on a wire rack for a bit, try not to eat any. I dare you! 
They are wonderful.  They don't have as heavy of a feel as a muffin, but more airy like a cake.  They are nice and light. I enjoyed ours with a dusting of powdered sugar.  Mr. Bacon and Bacon Bit approved them right away and I had a hard time packing them up to share.  Good think the mini muffins make 4 dozen, but I have a feeling they won't last until morning!

Wednesday, July 6, 2011

Mom's busy! Have a TV dinner.

What? Did Ma Bacon just suggest a TV dinner? Aren't those expensive and unhealthy?

Guess what, I've been busy lately!  Hard to believe right?  Honestly most days I'm not sure when one ends and the next begins.  So I've needed to take some steps to help out around the house during this busy time.
Why am I so busy (besides running a household and raising 4 kids!) I've decided to take on the challenge of staring my own etsy store.  EEK! It's a big task, but I love sewing and making things besides just cooking.  And I thought perhaps a little extra bacon in my pocket would be nice, especially going into Christmas season.  What, it's not Christmas season you say? Sure it is, Christmas is only 171 days away!  So add one more thing to my busy plate.  If you are interested in taking a peek, feel free to click on the banner below or here.  I've just started so hopefully there will be many more wonderful items added to my store if time allows.  But it's a start anyway.


 So I've been sewing away making things.  And time happens to slip away from me and before I know it, it's dinner time. Again. We need to go grocery shopping bad, it's been 3 weeks since our last trip.  I also have no set meal plan so we've just been winging dinners.  A very dangerous thing, but luckily we've managed to eat out of our freezer and pantry without making extra tips to the store!   Mr. Bacon was off working and the kids were hungry, and I needed to think fast.  The muffin pans for lunch the other day were a success so I thought, why not for a special treat for dinner!  The kids were ecstatic!  They even got to eat their 'TV dinners' in the living room in front of the TV.  Ok I'll admit it was because I had my sewing stuff all over the kitchen table but they didn't complain.  We turned on a movie and they happily munched away.  So what did I put in the TV dinners?  I was under orders from Bacon Jr it couldn't be lunch stuff, lets just say we compromised! 


Mini peanut butter sandwiches cut with the little star cutter, chips, pizza puffs I had in the freezer, strawberries with cool whip, and in Little Miss Bacon and Little Boy Bacon's cut up hot dog with ketchup, and Bacon Jr (since he doesn't like hot dogs) tortilla's with cheese and pizza dipping sauce.  Another successful dinner!

Wednesday, June 15, 2011

A readers Muffins from my mix

I had an awesome reader let me know she used my pancake mix to make some amazing muffins! They look so good. Even the Bacon kids asked if we could make them for breakfast! And indeed we will. But I wanted to post the recipe here so all my readers could enjoy, and thankfully she agreed I could share it!

So here it is! First you need to start out with the pancake/muffin/biscuit mix I posted about Here!

Wyldcat's Muffins:

2 cups pancake mix
1/3 cup sugar
1 cup milk
1 egg, beaten
1/3 cup vegetable oil

Preheat your oven to 425*. Combine pancake mix and sugar in bowl. Add in milk, egg and oil. Mix only until everything is moist, and make sure not to beat the mix. Just like the rule in the Bacon house, there is no beating, hitting, kicking or throwing things- this applies to muffins too! In order to get nice fluffy muffins you need to gently mix them!

Fill a well greased 12 cup muffin pan about 2/3 way full with batter. Now the fun part comes- adding the flavor! My reader added her homemade blueberry jam (YUM! I think I need that recipe too!) to her muffins. I was thinking some of my triple berry would be delicious too. I already know what Little Miss Bacon wants, chocolate chips! Or how about some peanut butter and jelly for a different lunch treat? Some fresh strawberries from the garden would make these wonderful too. The possibilities are endless when it comes to muffins!

Here are her muffins all ready for the oven!


photos by wyldcat

Bake 17-20 minutes or until golden brown. You can also make mini muffins but cut back the baking time to 12-15 minutes.


photo by wyldcat

Waiting to be eaten! Don't they look delicious! Thanks so much wyldcat for sharing these with me! I'd love to hear from my other readers too, what's your favorite recipe? Have you altered any for your family's liking?

Sunday, May 1, 2011

MAYday MAYday... A muffin story

Once upon a time, in the land of Bacon.

"What's for breakfast Mom?" the kids questioned.

"Cereal again". the mom said.

The Bacon kids groaned "not again... We want something different".

Panic struck Ma Bacon's face. What can I make the kids that is different, that they will all like she wondered. She was about to call mayday for the reinforcements to come in, well just one really. But Mr. Bacon was still fast in his slumber (I can't blame him, he worked all night long). And then an idea grew in her head. "Let's make muffins" she exclaimed.

"I want chocolate." cried little miss Bacon.

"I want banana!" yelled little boy Bacon.

"No, apple for me." Bacon jr said.

And yet another dilemma arose.

How with the story end you ask? Is the suspense killing you yet?! I won't keep you waiting any longer. I will say I managed to please all 3 of the kids without needing to call mayday, on May day for that matter! I've had this recipe for a while now and decided this would be a perfect way to start our morning.

Mystery Muffins

1/4 cup sugar
1 cup milk
2 eggs
1/2 tsp vanilla
4 Tbsp oil
1/2 tsp salt
1/2 tsp baking soda
2 tsp baking powder
1 1/2 cups flour
Mix in's

Preheat oven to 350*. In mixing bowl add sugar, milk, eggs, vanilla and oil. Mix well. Add in salt, baking soda, baking powder and flour. Mix well. I have to say if you are looking for a good muffin base, this one is perfect! Pour into well greased muffin tins. We used mini muffins and it made 3 dozen, I'm guessing you'd get 12 good sized regular muffins if you went with the bigger muffin tins.

If you looked at the picture of my ingredients, you notice I have no oil. I decided to substitute some pear sauce for the oil. For one Bacon bit isn't eating it, and two, I figured with all the chocolate I knew was going into these muffins, I needed to do something to make it a bit more healthy!

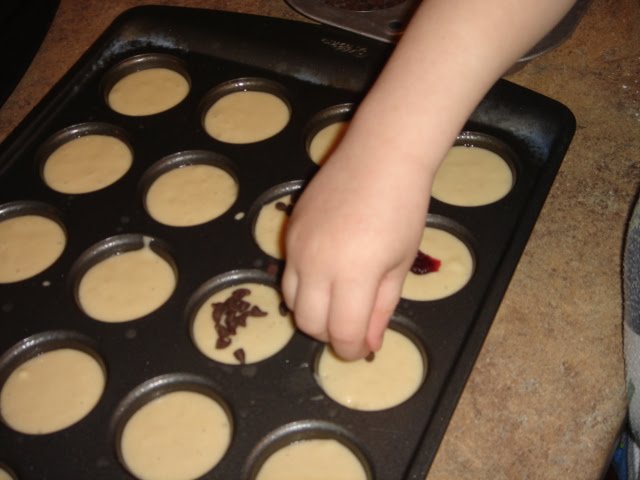
Next its time for the fun. Your mix in's. today we went with chocolate chips, diced apples with cinnamon sugar on them, chopped bananas, dried cranberries, raisins, chopped pecans, vanilla chips and triple berry jam. Oh and lets not forget some M&M's that somehow slipped into a few of these muffins! Better the kids get their sugar high in the mornings right?


Other ideas you can use are:
strawberries, blueberries, raspberries, blackberries
Peanut butter
any dried fruit
nuts
granola
cereal

Go search your cupboards, I'm sure you'll find lots of other inspiration to mix in these fun muffins.


The next part is what the kids were waiting for. Making their own creations! Little miss bacon was up first and happily added chocolate chips and M&M's to her muffins.


Little boy Bacon created his next. Not too shocked on all the chocolate that went into his, but he did try his taste buds on a few other things like the bananas he said he wanted and cranberries.


Finally Bacon Jr tried out his culinary skills by getting quite creative. Wanting to try a bit of everything he made apple pecan, cranberry M&M, banana raisin, apple vanilla chip, triple berry jam & pecan, and apple chocolate chip!


I created the rest of them. Here they are all ready for the oven.


I baked these in the oven for 14 minutes. For large muffins you'll want to bake them for 20 minutes.


Let them cool on the pan for a minute or two and then cool completely on a wire rack. I have to say I thought the toppings would sink in a bit more than they did. I think next time we make these I'll take a tooth pick and push them down inside a bit. I have to say, it was a fun time. I loved watching how creative the kids were making them. And how they critiqued their own work while eating them. They are already talking about what they want to mix in their own muffins next time we make them! As for me, I enjoyed mine with one of these! Hope you have a great May 1st!


Tuesday, January 25, 2011

Bad Banana


Bad Banana, Bad Banana..
Whatcha gonna do?
Whatcha gonna do when I come for you?

Ok so maybe I don't have a new hit on my hands! But what do you do when you have bananas going bad? Don't throw them out, they are perfect for baking with! I love letting some of the bananas we buy go brown because then I can make some of the best muffins with them. Everyone in the house loves muffins for breakfast and if I can hide good stuff in them, all the better for my picky eater Little Miss Bacon. From the time she started eating she hated bananas, but since she can't see the banana, she will eat these muffins by the handful in the morning. Mr. Bacon gave them two thumbs up when he sent me a text this morning saying "those banana muffins ROCK!" You know you have a winning recipe when everyone gobbles them up.

Banana Crumb Muffins:
1.5 cups flour
1 tsp baking powder
1 tsp baking soda
1/2 tsp salt
1/2 tsp nutmeg
1 tsp cinnamon
3 med. bananas mashed
3/4 cup sugar
1 egg slightly beaten
1/3 cup oil

Crumb topping:
1/3 cup brown sugar
2 tbsp flour
1/4 tsp cinnamon
1 tbsp cold butter or margarine

Preheat oven to 375*. In Bowl or mixer, combine sugar, oil, egg, and banana. Mix well. Add in cinnamon, nutmeg, salt, baking soda, baking powder and flour. mix until all is combined. In separate bowl combine brown sugar, flour, cinnamon, and cold butter until mixture looks crumbly. Place batter in well greased (I use olive oil cooking spray) muffin pan. If making regular size muffins (will fill 12 muffin tin pan), bake 18-20 min. During the last 5 min of baking, top muffins with crumb topping to prevent it from sinking into middle of muffin while baking. For mini muffins (my batch made 3 dozen!) place batter in greased pan and add crumb topping before baking. Bake 13-15 min. Cool on wire rack.

To make these even healthier, replace 1/2 cup flour with whole wheat flour. You can replace 1/2 or all of the oil with applesauce and you can decrease the sugar to just 1/2 cup. Next time I make these I will try out some of the healthier options. I usually replace oil with applesauce in my recipes, I just ran out in the house this time around.


Thursday, January 20, 2011

What is growing on your counter?


Remember this picture? I've been asked several times over the past years "what is in that bag?" And each time I tell the person asking, "the best bread you've ever had!" Nope this isn't another biscuit post, but it does include yeast. I promise this one won't take as much effort!

I remember seeing baggies of odd looking batter sitting on Grandma Bacon's counter when I was little too. I'd poke at it, squish it, and wonder what the heck it was, until baking day! The smell of a sweet breakfast bread filled the house, just as mine did today. Even the kids exclaimed that it smelled like cookies baking in the oven. So what is it you ask? Amish friendship bread, and the secret to making it is letting it 'grow' on the counter for 10 days. Traditionally someone gives you a bag of starter mix along with a recipe. You are to add to it and care for it for ten days. On that tenth day, you add a few more things to the batter, and divide it out into baggies and pass it on to your friends. After you hand out a few, you might find your friends running in the opposite direction when they see you coming down the hall! Yes they get a bit hard to giveaway after a while! My solution, bake the whole batch for yourself! It will make a lot of breads, but what better to have in the freezer than some yummy breads for breakfast, snack time or unexpected guests.

Here is the starter recipe.

In a GLASS or PLASTIC bowl (this step is VERY important. You don't want to use anything metal when mixing this recipe up which also means mix with a plastic spoon, rubber spatula, or my favorite a silicone whisk) mix:

1 package active dry yeast
1 cup milk
1 cup flour
1 cup sugar

Pour into a large plastic zip top baggie and label with the date. Place it on your counter- don't worry it will be ok! You've completed day one!

Day 1: Do Nothing.
Day 2: Mush the bag and let the air out
Day 3: Mush the bag and let the air out
Day 4: Mush the bag and let the air out
Day 5: Mush the bag and let the air out

Day 6: Add to the bag 1 Cup flour, 1 cup sugar and 1 cup milk. I mix these up on a bowl again (remember NO METAL!) and I have Mr. Bacon help me pour it into the baggie. You don't need a second set of hands, but it does help! Mush the bag and let the air out.

Day 7: Mush the bag and let the air out
Day 8: Mush the bag and let the air out
Day 9: Mush the bag and let the air out

Day 10: Mix and divide starter as follows. Pour the entire contents of the bag into a non metal bowl. Add 1 1/2 Cups Flour, 1 1/2 Cups Sugar, and 1 1/2 Cups Milk and mix well.

If you'd like to share the starters with friends, measure 1 Cup Batter into 4 gallon size zip lock bags. Keep one for yourself and give the other 3 to friends along with a copy of the recipe. You will end up with 5 batches of bread (4 bags and 1 in the bowl) Since I make the whole batch for myself, I skip this step.

Now you are ready to add the rest of the ingredients and bake the bread! One thing I love about this recipe is that there are so many ways you can make it. Today I made Regular (vanilla), Pumpkin spice, Chocolate peanut butter & lemon poppy seed. I can't wait for breakfast tomorrow!


Preheat your oven to 350 degrees. Place about 1 1/2 cups batter in the bowl - remember no metal spoons or whisk- use only plastic or wood for this!


Add:
3 eggs- beaten in a separate bowl before adding
1/2 cup milk
1 cup oil (you can make this healthier by doing 1/2 oil & 1/2 applesauce or all applesauce!)
1/2 tsp vanilla

1/2 tsp salt
1 1/2 tsp baking powder
1/2 baking soda
1 cup sugar
1 large box instant vanilla pudding (or 2 small boxes)
2 tsp cinnamon
2 cups flour

*If using Self - Rising Flour omit soda, salt and baking powder.

All ready for the oven!
Grease two large loaf pans or one 9x13 inch pan. You can also make muffins with the mix. One batch will make over 4 dozen mini muffins or over 24 regular muffins. I say over because I don't have more than 2 muffin pans and I usually take the left over batter and bake it in a ramekin dish in the oven. The kids love these special 'mini' loafs! Bake 350 for one hour for loafs, 15-18 minutes for mini muffins or 20-25 minutes for regular muffins, or until a toothpick placed in the center of the loaf comes back out clean.

Here are some variations you can use that came with my recipe that was handed down to be my a friend. Feel free to make your own flavors too. You really can't go wrong with this bread.

Pumpkin:
Add 1 box pumpkin spice pudding and 1 vanilla instead of just the vanilla or two pumpkin spice pudding mix. I add in 1/2-1 tsp of pumpkin pie spice to this too!

Chocolate Bread:
Use the basic mix recipe except use Chocolate Pudding instead of Vanilla make sure to add the 2 tsp cinnamon it really makes the bread taste the best.

Peanut Butter Cup:
Used basic mix recipe, except use Chocolate pudding instead of Vanilla. Omit the 2 tsp cinnamon in the batter. Add 4 Tablespoons creamy peanut butter to the batter and one bag Reese's peanut butter chips. I didn't have the peanut butter chips this time, but it still tastes great without them.

Cherry Cheese Cake or Strawberry Cheese:
I used the basic mix, omitted the cinnamon and used two small boxes of cheese cake pudding instead of the vanilla. I added a small pack of cream cheese or 1/2 large pack (3-4oz softened) and 1/4 cup more milk. You also need a can of Cherry or Strawberry pie filling. After putting the batter into the pans dab teaspoons of cherries on top of them and swirl around with spoon to mix in the cherries. Cook at 325 until dark golden brown.

Cinnamon Struesel:
Before I start the Amish bread I get my pans ready and make the streusel 1 stick butter or margarine at room temp. 2/3 C – 1 cup packed brown sugar 2/3 C – 1 cup flour cinnamon - as much as you like. Put the ingredients together. (1 C chopped pecans are optional.) This will make approx. 2 cups. If you like a little more, increase the sugar and flour to 1C each.
Make your Amish bread according to directions. Use French Vanilla pudding or Vanilla Pudding. Put approx. 1-1/2 C batter in the bottom of each pan and spread into the corners. (Batter will not be runny - sort of a heavy batter.) Top with 1/2 C streusel, remaining batter and remaining streusel.

Banana Nut Bread:
Use the basic mix with 1 cups of walnuts or pecans , 2 large mashed bananas and 1 large box of banana cream pudding instead of vanilla pudding.

Lemon Bread:
Substitute lemon pudding mix and use 1 tsp almond extract instead of vanilla, omit the cinnamon. You can add in 2 tsp poppy seeds to the mix.

Butterscotch Bread:
Add 1 Large box of butterscotch pudding and 1 1/2 cups of butterscotch chips. Omit cinnamon.
proceed with recipe.

Apple Cinnamon Bread:
Make the streusel 1 stick butter or margarine at room temp. 2/3 C – 1 cup packed brown sugar2/3 C – 1 cup flour cinnamon - as much as you like Put the ingredients together. (1 C chopped pecans are optional.) This will make approx. 2 cups. If you like a little more, increase the sugar and flour to 1C each. Make your Amish bread according to directions. Use Vanilla or French Vanilla pudding. Put approx. 1-1/2 C batter in the bottom of each pan and spread into the corners. (Batter will not be runny - sort of a heavy batter.) Add 1 can apple pie filling evenly throughout the each loaf. Top each loaf with remaining batter and the Add streusel topping last, bake as directed.

Orange Pecan:
Use Orange extract (I use about 4 Tsp). You can also add 1/3 c. of orange juice and use only 2/3 c. of the oil. I have also used Orange Zest as well and then use the juice of the orange instead of juice. I have used chopped pecans and have also done it with toasted Almonds as well.

Tropical paradise:
Replace vanilla pudding with cheesecake pudding. Add 1 small can of mandarin oranges and
1 small can of crushed pineapple(I mix the oranges and pineapple together to equal about 1/2-3/4 c. of fruit) Add:
1/4 c. coconut
1/2 c. white chocolate chips
1/2 c. Chopped macadamia nuts (optional)
This bread is so moist you have to cook it a little longer than usual.

German Chocolate:
I use the chocolate pudding instead of vanilla. Take a can of German Chocolate frosting and cut it into the pans using a knife. This takes a little longer to bake as well.


So how do I keep all these yummy treats from going bad? My second favorite kitchen gadget, my food saver! My model has a button that I can stop the suction of air and just seal the bag half way though which makes it so I can't squish the breads. They freeze very well this way. Don't have a food saver? No problem, you can wrap the bread in plastic wrap and tin foil or freezer paper.


So plan ahead a get a starter bread going, what kinds are you going to make? Make sure to look at your calendar, you want to make sure 10 days from now you will have time to bake up the bread!

**Many have questioned how the milk can sit out on the counter without going bad, it is because of the fermentation process that happens when you add the yeast. It's much like a sour dough bread. If you are worried, according to some studies,starting with a buttermilk instead of pasteurized milk is slightly more safe because of the bacterial cultures. But if you are making it all for yourself and baking one large batch instead of passing the starter on, It's ok to just use regular milk. I hope that helps clear up some confusion. I'm happy so many are trying out this recipe!

**If you are sharing this starter with others, there should be about 1 cup starter in each bag.  The person you pass it on to will take the starter and add day 1 ingredients to it and follow the rest of the 10 days before baking. :) They might not get as big of a batch out of it but it won't be that noticeable. Happy Sharing!
 

Tuesday, October 19, 2010

A faster donut


Remember about a month ago I was having a crazy pregnancy craving for donuts? If not, then check it out here. Well I can't blame the cravings on pregnancy now, but today I caught myself daydreaming about donuts again. And then I remembered the recipe my friend sent me a few days after my donut post for donut muffins! So I had to try them out today.

Donut muffins:

Regular muffin pan – yields 12

Mini muffin pan – yields 36

1/3 c. shortening

1 egg

1 ½ t. baking powder

¼ t. nutmeg

½ c. white sugar

1 ½ c. flour

½ t. salt

½ c. milk

For after muffins are baked, see instructions below:

6 T. melted butter

½ c. white sugar

1 t. cinnamon


Preheat oven to 350 degrees. Mix thoroughly the shortening, sugar and egg. Add alternately the dry ingredients and milk. Do not over beat. Fill muffin tins about 2/3 full. Here mine are all ready for the oven!

Bake to a golden brown; 20-25 min. for regular size, 15 min. for mini-muffins. Here are mine all out of the oven. They're even yummy just this way without the sugar coating. I just couldn't wait, I had to try one right out of the oven.

While muffins are baking, melt butter and set aside. This I found out is an important step. You need to let the butter cool for a bit after it's melted. If you don't, the sugar dissolves when you dip the muffin in it like in my picture here. You can see the front left muffin the sugar had dissolved, unlike the one's farther back that were dipped once my butter started to cool. See you learn something new everyday right!

In a separate bowl (I used a ziploc type baggie for this, it worked great. I just dumped the muffin in and gave it a shake. This could be a great step for little helpers!), combine white sugar and cinnamon and set aside. Remove from pans and dip at once into melted butter and then into sugar mixture. I dipped just the tops in the butter. Another key to these is to dip them RIGHT after you take them out of the pan. Yes they'll be a little warm but that's the idea, the sugar will stick the the muffin if they are still warm.

So how do they taste? JUST like a cinnamon sugar cake donut hole. They are delicious I have to say. Little boy bacon couldn't leave them alone either, I think he stole 3 right after I dipped them. Mr. Bacon, being an expert in donuts, approved of them as well! I guess I know what I'm having with my coffee in the morning, do you?