Wednesday, June 29, 2011

Whats for lunch? What's for dinner?

Some days I just DREAD those questions.  I don't know, let me find my menu list...humm.. nope that doesn't sound good. What else is in the cupboards?  Sound familiar?  But for once, I had it all planned out. I had a super cute idea for the kids lunch which I knew they would love.  And dinner I was actually looking forward to what I had planned. Mainly because it was one of those delicious bacon wrapped pork loins I told you about here


Lets start with lunch.  Since schools been out for three weeks now (yes I've survived 3 weeks so far, and I haven't started counting when they go back yet, so that's a good sign that we are having a lot of fun!) I wanted to do something fun for lunch time.  I've seen this idea a lot of places that involve muffin tins.  You fill up each cup with a different item and VIOLA! easy lunch!  My kids love the idea of 'snacks' for lunch  or dinner so I knew they would gobble up this idea and they did.  I had fun finding different things to put in each cup too.  We have decided to try to make this a once a week lunch adventure too. If you are wondering there are PB crackers, cheese, skittles, pepperoni, strawberries and apples.  Little Miss Bacon had yogurt in her's since she doesn't eat cheese. I know, who would have thought there were kids out there that don't like cheese!


So we have lunch covered, one down, one to go!   I relaxed all afternoon with the relief of knowing what I was making for dinner.  It was nice. So about 4 pm I went and dug out the pork loin from the freezer so I could start on dinner.  Ok so it was kinda late to get started, we got busy playing and the day slipped away from me so I had to thaw the pork in the microwave.  I tossed the package of frozen pork in the micro and started in dicing my potatoes.  BEEP, BEEP. Meat's thawed.  Took the package out of the microwave and learned a good lesson the hard way!  I didn't defrost pork loin, I defrosted pork CHOPS. UGH.  There is a very good reason why when you buy foods in bulk and food save them and stick them in the freezer you should label them.  Why we didn't write on them like we always do I don't know.  I blame it on lack of sleep and mommy brain!

So now what am I going to do. I could attempt to do bacon wrapped chops, sounds good, but not as good as loin.  I decided barbecued chops sounded good.  Mr. Bacon wasn't to be home from work for a while yet, and lets face it my grilling skills are no where near what my baking skills are so grilling was out of the question.  I decided to bake them in BBQ sauce.

The pork chops were the easy part- place some BBQ sauce on the bottom of my pan, lay in the chops, cover with sauce.  Place in 350* oven.  

  There that wasn't hard!  Now what do I do with these potatoes I already diced up?
  
Honestly I was thinking that twice baked potatoes sound awesome to have with these chops.  But that takes along time to make.  And I already have a bunch of cut up potatoes.  Then the light bulb went off!   Why not make the diced potatoes with the twice baked ingredients on them?!  Yes sometimes the brain works, it just takes some time. 
 
 I dug though the fridge and pulled out what I normally place in a twice baked potato.  Milk, sour cream, ranch dressing, butter (melted), cheese and bacon.  Well I didn't have cooked up, crumbled bacon so I improvised with some 'Bacon,Bacon' from tastefully simple I had in my cupboard.  I will tell you I didn't measure anything. I just dumped and poured until it looked good. I was pressed on time to get these in the oven and have them done in time to have with dinner.  So if you are going to try this, you'll just have to wing it and use your best guess.  I poured  all the ingredients in a bowl and mixed well until everything was coated.  Then I tossed it in a well greased 9x13 pan and placed it in the oven too. 
 Oh and because I'm a super awesome good mom, I put some potatoes in a separate baking dish and put my usual spices on them with some oil since I knew Little Miss Bacon wouldn't come near my others!  She was very happy and ate everything in her 'special' dish! Which I was happy with since it was a whole potato cut up in there!
  
 I let everything bake for about an hour and a half.  How did it turn out?  DELICIOUS!  It was a great dinner.  Not bad for having to improvise last minute.  Goes to show you not everything goes as planned, but it wasn't hard to save the day! (or err.. dinner!)
 

Sunday, June 26, 2011

How cute is mini pie?

 Well I have officially turned another year older today, or 29 again right?!  Either way I had a great day and celebrated with my family.  And to end the night I thought I'd share another great recipe that I whipped up this week.  (I have lots on my camera.... I realized looking for these pictures I have quite a few posts I'm behind on! So you'll be hearing lots from me!)
Mr. Bacon is working some crazy hours lately and needs some yummy cooking to help him get though his shifts.  What better comfort food than Chicken pot pie!  And everything tastes better when it's mini right?  So I made up some mini chicken pot pies for his lunches.  I can't guarantee how many he'll get right now though, Bacon Jr. found them and started gobbling them up too!  Yes they are a hit around here, I'm so glad I made a double batch!
So what do we need to get started?
Chicken pot pie:
1 lb chicken breast - cubed
1/4 cup Italian dressing
4 oz cream cheese
2 tbsp flour
1/2 cup chicken broth
1 package or about 2 cups frozen mixed veggies
 
Heat your oven to 375*.  Place cubed chicken in pan with 1 tbsp oil and season it with your favorite seasoning. I used Mrs. Dash Garlic & Herb again.  While that is starting to cook, I make sure my veggies are thawed by running them under some warm water and letting them drain.  I also got my broth going. This time all I had in the house was the cube kind in the cupboard. Hey whatever works right?! 


Now go check on that chicken.  After it's been cooking for about 5 minutes, it's time to add in the cream cheese (remember in my pics I was making a double batch.  If you follow the recipe above you won't use as much as I do in my pictures!)  I do cube up the cream cheese before I add it in. It will help it melt faster. 


 Stir the cream cheese in until it's all melted.  It will look nice and creamy- see!

 Now it's time to add in the flour.  Mix it around well. It will make the chicken mix thick. 
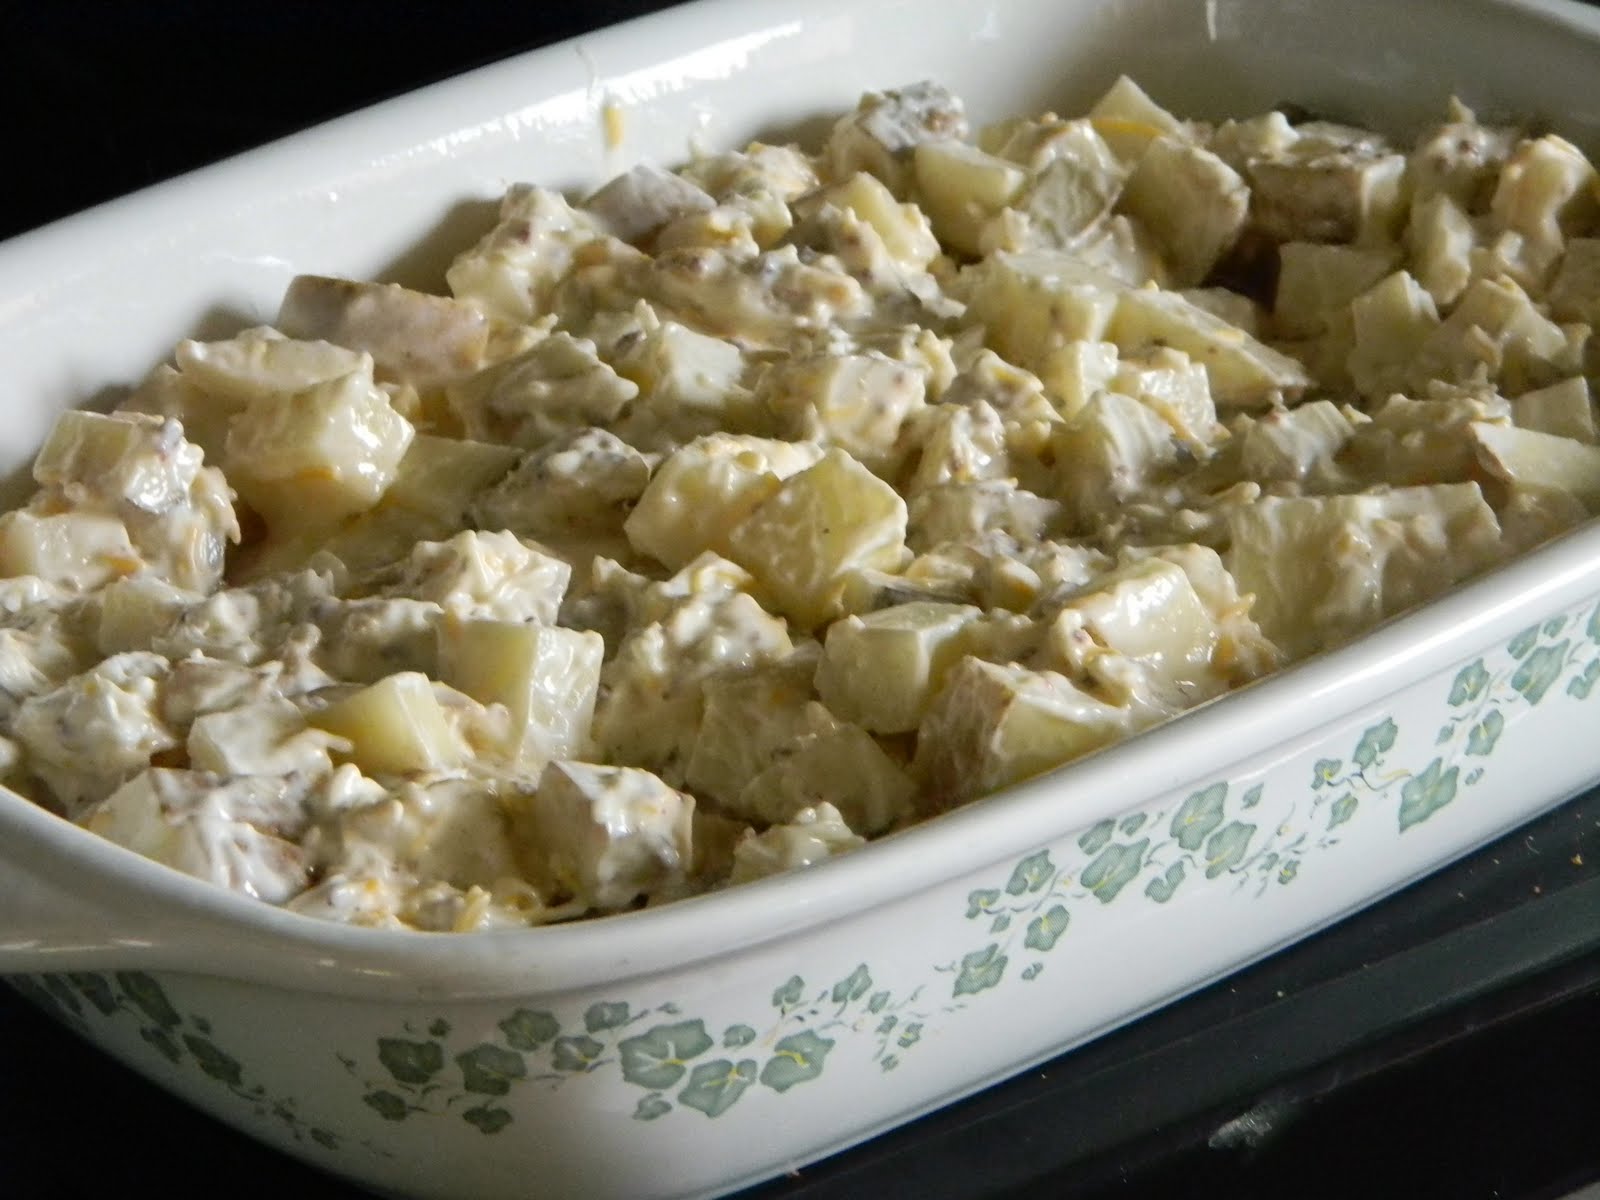
 Once the flour is mixed in, add in the veggies and the broth.  Let this simmer for about 10 minutes now. That was a simmer, so make sure you turned down the dial on the stove!  Yea, you learn from mistakes right?
 
 Now it's time to get the dough prepared.  I had started to use refrigerator dough. I had a package left in the freezer and knew it would work well for this.  It didn't go far.  I had to make up a batch of homemade dough using Grandma bacon's recipe above.  And I'm glad I did- homemade tastes so much better!  Take the dough and roll it out to about 1/4 inch thick.  Then I just kinda tore off chunks of it and mushed it into my well greased (YES WELL GREASED! There I put it big enough so hopefully every one's potpie comes out when it's done baking!) muffin tin.  It's ok if some over lap and  it' doesn't look pretty. It will still taste good. I trimmed off the excess around the top. In hind sight, I wish I would have left a bit overhang so I could press it together when I put on the tops.  Hey you have to learn from the mistakes you make, thankfully for you, I've already make them! Once you get your dough pressed into all the cups, take a fork and poke a few holes in the bottom.  This will help the dough stay put. 
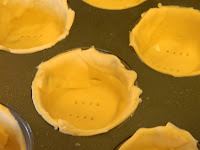
Now it's time to fill the cups!

So now for the tops.  I had wondered how I would make cute little circular tops for the potpie.  So I started to measure round things around my kitchen. See no need for fancy gadgets!  The cups I tried were all too big, the donut cutter was too small, then I happened to find a caning jar ring and it was just right. (I promise there will be no bears looking for their porridge in this story!)  I rolled out more dough and cut circles from it. Then I smooshed them on the top. I tried to squish it to the bottom crust dough as much as I could. This is where it would have been nice if I had left a bit extra overhang.  Oh well, learned for next time.   Now that the tops are on, you need to poke vent holes in them, I take a sharp knife and slit in 2 holes on each top. 
 
 And now they are ready for the oven.  I baked mine at 375* for 18-20 minutes until the tops are golden brown.  

 Here they are out of the oven, yes you notice the mess I made.  They cooked over and out everywhere.  It's ok they still are fine!  But again if I had left some overhang from the bottom crust to secure the tops better I could have prevented this. 


Once they are out of the pan, they look cute and delicious and no one will ever know the difference!  I placed them on a baking sheet and put them right into the freezer. Well the one's that haven't been eaten anyway.  Once they were frozen I packaged them by two's in food saver bags so they will stay fresh, you can place them in ziplocs type baggies or wrap in foil or freezer paper too. 

Don't they look delicious!  Now you see why they are not lasting around here!
 
I had thought about making pies in a jar, but I didn't have enough energy left in the day, or pie filling in the house! So I decided to make homemade pop tarts!


  Again using my caning jar ring I cut out circles and placed them on a cookie sheet. 
 
 Added a spoonful of my homemade strawberry jam to each one, and topped them off with another circle of dough.  
 Then crimped the edges with a fork. Press hard enough to seal them, not just make cute designs around the edges. 
 All ready for the oven. I baked these in the 375* oven for about 8-10 minutes until golden brown.
 Cooled them on wire racks.
  
 I made up a quick powder sugar, milk and almond extract frosting to drizzle over the top.  Add some food coloring for fun colors... and
 
 TADA! Pop tarts made with love!  The kids were so excited for these.  They didn't last until breakfast, every last one was gone by dinner time! 

Monday, June 20, 2011

S'more's and Sushi

What a combination huh?!  That is what we cooked up at the bacon house for lunch today.  Now before you think my kids are real adventurous with their foods, read on!  It's a colder damp day around here, and lots of rambunctious kids running around so I needed something to stop them in their tracks for lunch today.  I was searching the other day on my newly founded favorite site Pinterest.  Anyone else on there?  I have to say it's addictive but I love that I can see all the great ideas I find on the Internet and organize them in one spot.  If you've never been to the site, it's a great!  In the past I would find an idea I wanted to try out and book mark the site.  But then my mommy brain would kick in I'd forget what I book marked!  Now I can save all the great ideas in one spot, have them by category and find them easy again by pictures.  The other great thing is you can browse other people's boards too and see what great ideas they've found and 'pin' them onto your board.  Now lets see if I can actually find time make all the things I've found!

So while searching that wonderful and addictive website I found PB&J sushi rolls.  Perfect for lunch today!  I used both tortillas and bread for our rolls.  For the bread I rolled them flat using my handy pastry roller, but you can also use a cup!  Cut them into strips about 1.5- 2 inches, spread some PB & J and roll up!   I earned extra points by adding some chopsticks to eat them with!  They are so cute, and yummy!


For dessert we needed a sweet treat too.  Again from that fun site I was able to find these s'more's on a stick.  Another great idea that even the kids can help with.  


Here's what you need:
 Graham crackers
Marshmallows
Chocolate chips
sticks- I had these fancy sucker one's leftover from an attempt to make cake balls, but popsicle sticks would work too.


First crush your graham crackers in a baggie and then dump them in a bowl.


 Place your chocolate chips in a microwave safe dish. As for how many I used, I just guessed.  I wasn't making a ton of these so I think it was about 1/3 of a cup of chips.  Microwave until they are melted and stir. 


Prepare your marshmallows by inserting a stick into them.


Then start dipping them into your chocolate.  Roll them in the crushed graham crackers and place on wax paper.  Tada -  S'mores on a stick!  Now you can eat them just this way.  The warm chocolate reminded me of how they are around the campfire.  Or you can stick them in the freezer to let them firm up a little.  Once you pull them out of the freezer, stick them in the microwave for a few seconds- 5 was long enough for mine.  You want to watch the marshmallow start to puff up.  Then pull them out.  The marshmallow will be soft inside but the chocolate outside is still hard- delicious! Either way they are really good! Enjoy!


Ok I know  I'm late at adding this, but I thought I'd show off what else I did today.  Yes I've been busy! I had found this cute lovie on pinterest too!  I knew I had to make one so I broke out some paper to make a pattern and my sewing machine and about a half hour later 'Tilly' was born!  Bacon Bit LOVES it!


Thursday, June 16, 2011

Bored Bacon


I'm SOOOO BOOORED. Oh do you hear the echos all the way to your house? And schools only been out for a week and a half! (in their defense it was raining out all day) So what do you do with a bunch of bored kids? Give them cookbooks of course! Yes I did, I gave each of my adorable kids a cookbook and a pack of post-it notes with one instruction. Find ONE recipe that they would like to make special with just mom. Well this is what Little Miss Bacon found.


And the bottom of the book has just as many notes on it too! She started with a full pink pad, and then ran out about 2/3's of the way though so she had to finish off with Bacon Jr's green ones. Needless to say she found some yummy recipes, and I will remember not to give her the 'bake goods only' cook book again! But she did have fun. I did tell her to narrow it down to which one she'd like to make first. Let's just say she's still deciding!

Here is Little Boy Bacon's book. He found quite a few also. He wants to start with a lemon cheesecake he told me so that will have to wait until we go shopping for all the supplies. But he's so excited to try it.


As for Bacon Jr. well, he looked though an entire cookbook and only found two recipes he really wanted to make. At least he was trying to follow the rules! It just so happened that one of the recipes we had everything on hand for, Vanilla popcorn. (the other is a chocolate Carmel cheesecake!)


All the kids were very excited to get to make something and try something new.
Here are the ingredients you need.


Vanilla Popcorn
3 quarts popped popcorn (it's 12 cups, I had Bacon Jr. help figure it out! Yes a math lesson too!)
1 cup sugar
1/2 cup butter, cubed
1/4 cup light corn syrup
1/4 tsp baking soda
1/2 tsp vanilla extract

Place all your air popped popcorn into a large bowl and set aside.


In sauce pan combine sugar, butter and corn syrup.


Cook over medium heat, stirring occasionally. Bring to a boil. Once it's boiling you want to boil it for 2 minutes stirring constantly. After 2 minutes remove the pan from heat.


Stir in baking soda and vanilla and mix well. It will turn thicker. See!


Pour the mix over your popcorn and mix well.


Let it cool for a few minutes in the bowl. Now it's time to spread it out on wax paper and let it cool.


The recipe says to break it up, I kinda dropped it by clumps on the paper and broke up any remaining clumps. Let it cool all the way and then it's time to enjoy!


So how did they like it? Bacon Jr. LOVES it. Little Boy Bacon didn't think it was too bad, and Little Miss Bacon said she didn't care for it. You can't win them all. Honestly I didn't think it was bad at all. It's not as dry as carmel corn, kind sticky too so make sure you keep some wash cloths around. A handful of M&M's make it a great special snack too.

In all it was a fun time with the kids. And they liked baking a treat they picked out. We will be back baking more together and I will share them here too. I have a few other tricks up my sleeve to keep them busy this summer too and I can't wait to share them also! I'll be tagging them as summer fun so it will be easy to find if you happen to hear the 'I'm bored's" at your house too!