Monday, April 25, 2011

Whats on Bacon Bits plate?

Remember when I made these cute little cubes for Bacon bit? We'll I've made a LOT more since then. Bacon bit is now 7 months old (how did that happen?!) and he's eating more now. We've found though some trial and error and pulling my hair out that Bacon bit prefers his food to be a bit more thick than most babies. If we get anything runny near him he clamps his jaws shut and turns his head. Oh the battle over food starts already! The good thing is that since I'm making his food, I can control just how thick it is. He's also decided he as quite a palate and will not eat anything that is bland, such as most store bought baby food. So I had to start getting creative in the kitchen. Here are a few of his favorite recipes he wanted me to share with you!

Baked apple prune:

2 large apples or 3 small cored, it's ok to use 2 different 'kinds' of apples too!

1/2 tsp cinnamon

9 dried prunes

Make a pouch out of tinfoil, set apples in cut side up. Sprinkle with 1/2 tsp cinnamon and add prunes. Add 1/2 cup water or apple juice. Bake 350* until apples are tender, about 45 minutes. Remove 1/2 to all apple peels. Place everything including juice in blender, puree & freeze. Sometimes I also run the puree though my kidco food mill to make sure the skins are well broken down. It gives it a smooth consistency and I make sure there are no chunks too big that he'll choke on that might have been missed when pureeing in the blender.

Lots of baked up goodness for Bacon Bit's belly!

Sweet potato & Pumpkin:

(this tastes like pumpkin pie!)

2 sweet potatoes

1/2 can pumpkin puree (or about 1 cup) NOT pumpkin pie filling

1/2 tsp cinnamon

Cut sweet potatoes in 1/2. Place cut side down on pan and add enough water until they it covers 1/2" of potato. Bake sweet potatoes in oven 350* until tender or about 45 min. Let cool on the pan (this also allows for them to soak back up some of the water they sat in.) Peel off skin and discard. Blend with pumpkin and cinnamon in blender or process though food mill. If it looks too think you can add up to 1/2 cup liquid when blending. Pour into your cubes and freeze.


And if you haven't figured it out yet, I like to multitask! So I decided to bake some bread that day too. I got a bit sick when I saw the price of a loaf of bread at the grocery store the other day. I knew I needed to get in gear and just start making our own bread. I tried a new recipe for oat bread. Well, either it was the weather, or being too busy, or something... but it didn't turn out. I even took a picture to share, yeast and I don't always get along! It did still taste good, it was a more heavy bread, sadly I just can't say no to bread! I'll keep searching for a great homemade bread and keep you posted!

Saturday, April 23, 2011

Easter at the Bacon residence


Happy Easter to all my wonderful readers! I hope you have a great day tomorrow. I spent some time this morning going though my meal plan for what I thought would be Easter dinner tomorrow. We were planning on a late dinner since Mr. Bacon found out very short notice that he will be working tomorrow. I have to say I wasn't looking forward to it, starting to eat dinner at 6:30 with 4 tired crabby kids didn't sound like much fun, or that it would go over well. But I wasn't compromising on our family dinner!

I was talking about this with Mr. Bacon today after lunch, when he came up with the suggestion for us to have our family Easter dinner tonight. That way we could eat as a family, and not have it be super late. Yes, in the Bacon house 6:30 dinner is super late! Bed time for the kids is 7pm! (ahhh...a quiet house at last!) I swallowed hard and said 'Sure, we can do a big dinner tonight'. A quick glance at the clock, Sigh... 1pm already. Where to even start, I was planning on having all day tomorrow to bake and get ready. So what is on the menu anyway? OH before the that I should mention, there will be a lot of pictures to this post, I guess I got camera happy again.

Ham
Cheesy hash brown potatoes
Green bean casserole
Homemade biscuits
and some kind of dessert

I was planning on making angel food cake, something I've been craving for a while now, but it was too late in the day already to start that if I needed to be baking a ham. I knew making homemade biscuits needed time to rise- twice! So I got to work. I used my recipe I wrote about 
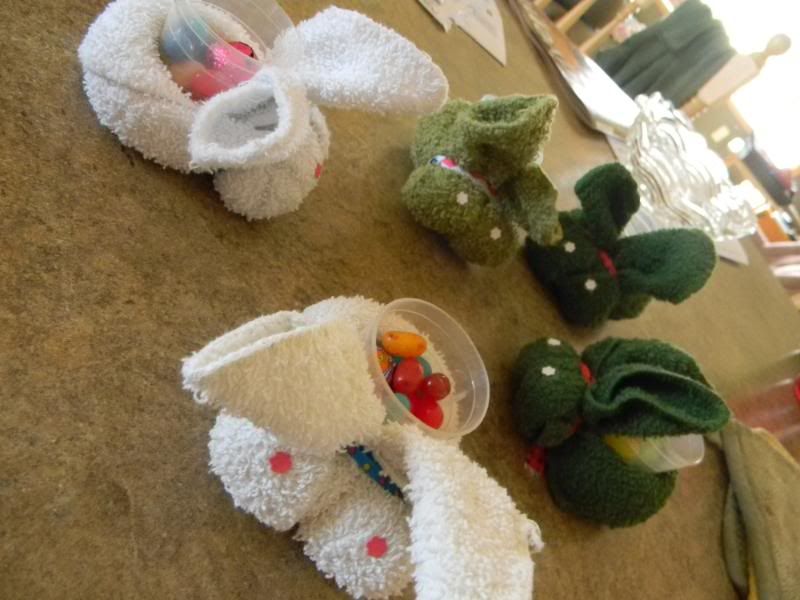
here. Once I got the dough ready for the first rise, I decided I needed something fancy for the table. Yea like there wasn't enough on my to-do list already. But I did have an hour to wait around for the dough to rise.... So I decided to make these cute bunnies!

Super cute and one for each of us. Ok I shared mine with Bacon bit. I ate the candies, he tried to eat the bunny. Oh the life of a 7 month old! So where to start? First you need:

Washcloth
rubber band
ribbon- optional


Start in the corner with the tag and roll up the washcloth.


Fold the roll in half.


And then in half again.


Secure a rubber band around the top part to create a bunny face. You can then cover this with ribbon, or skip the rubber band and just tie with ribbon.

Tada! you have a bunny!

I decided to wedge one of these tiny Tupperware cups I had in the back side as a treat holder. You can also place on of those wonderfully decorated eggs the kids worked hard on behind the ears.


Help they're taking over the place!


Ok so now that those bunnies are done, time for the biscuits. I decided to do clover biscuits- nothing fancy, just decided to add 3 dough balls to each cupcake tin. I let them rise on the counter. Now before I get started on that ham, I've decided to go completely crazy! I needed something for dessert. Looking though the pantry didn't find anything quick, I peeked in the freezer and found those chocolate chip cookies I hid in there! Perfect!I rolled them into balls since the dough was frozen. I quick baked them up in between letting the biscuits rise and preparing the ham.


Now on to the fancy ham. We bought just a basic ham, one that was on sale. But I'm never happy with the taste of it as is, so I add the Ma Bacon touch to it! Here's what you need.


Ham (mines 9lbs!)
1/2 cup brown sugar
1 can pineapple chunks
Whole cloves
1 cup (8oz) cola soda

First, take your ham and place it in a large roasting pan. Dump cola over top. Rub 3/4 of the brown sugar required over the ham. Don't forget the front where it was cut! That's the best part in my book.


Now take out your whole cloves and count out 20, this is important- well the number of how many you use isn't that important, (I use 20) but just so you remember how many to use. Next take tooth picks and stab the pineapple chunks and stick them around the back ham. You should leave your guests wondering if you're serving ham or porcupine! Then slowly pour the pineapple juice over the ham, try not to remove the brown sugar. Sprinkle the remaining brown sugar over the ham. and dump the rest of the pineapple juice and chunks in the pan. Take a large piece of tinfoil and make a tent over the top of your ham. It's ok if there are some holes in it, it lets the steam out. Place it in the oven at 350* for 15 minutes per pound. Or what ever your ham says. Go ahead, ask it.


So bunnies made, check, ham in the oven, check. While the ham is cooking if your biscuits are done rising.. biscuits, what biscuits you ask? Remember those we left on the counter to rise, next to the baked cookies? Oh those biscuits. It's time to pop them in the oven too and bake them. Ten minutes right along with the ham should do it. Once golden brown, take them out to cool on a wire rack, then pop them in a cloth lined bowl or basket and they're ready for dinner.

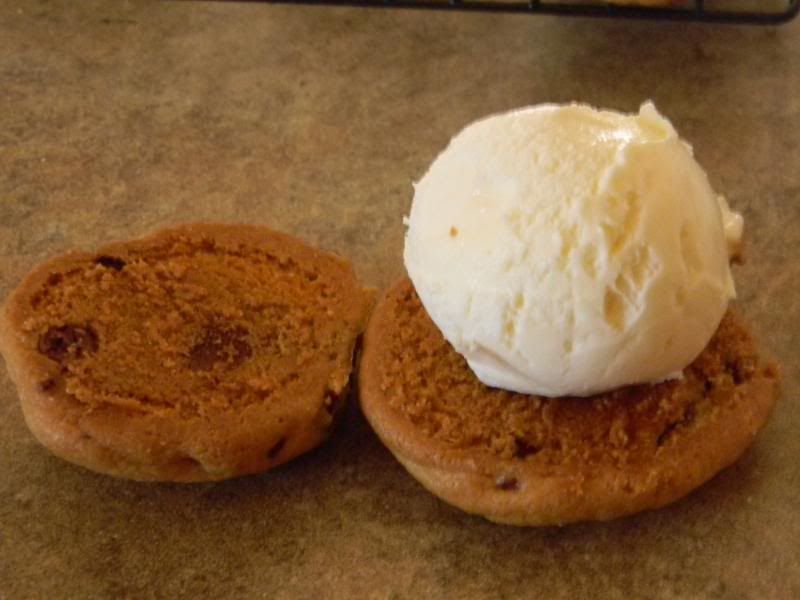
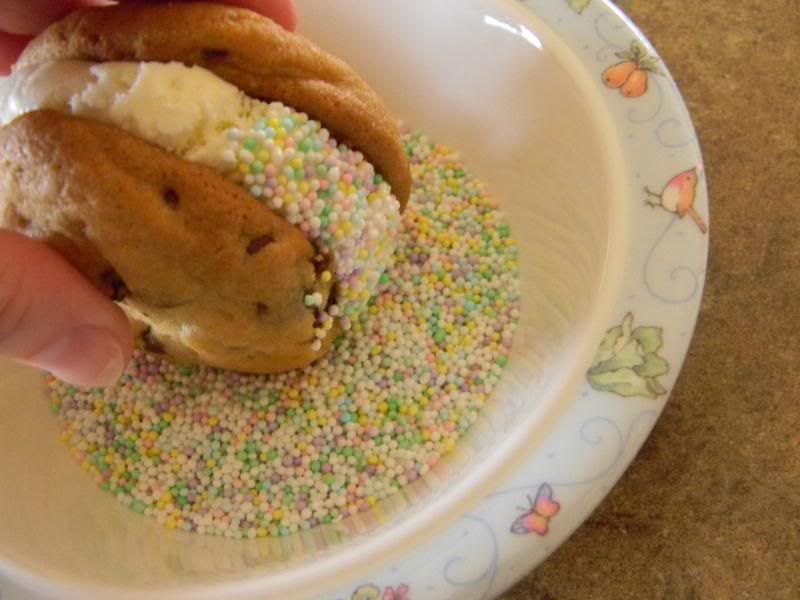
Now what to do with those cookies? I really had no plan on dessert for dinner until I saw the cookie dough I froze a few days ago in the freezer. Perhaps it was because they were sitting next to the ice cream we opened yesterday, but I figured what's better than homemade ice cream sandwiches! Take two cookies about the same size. Place one medium size scoop of softened ice cream on top. Then place the other cookie on top and squish together. I decided to roll mine in Easter sprinkles just for the holiday.


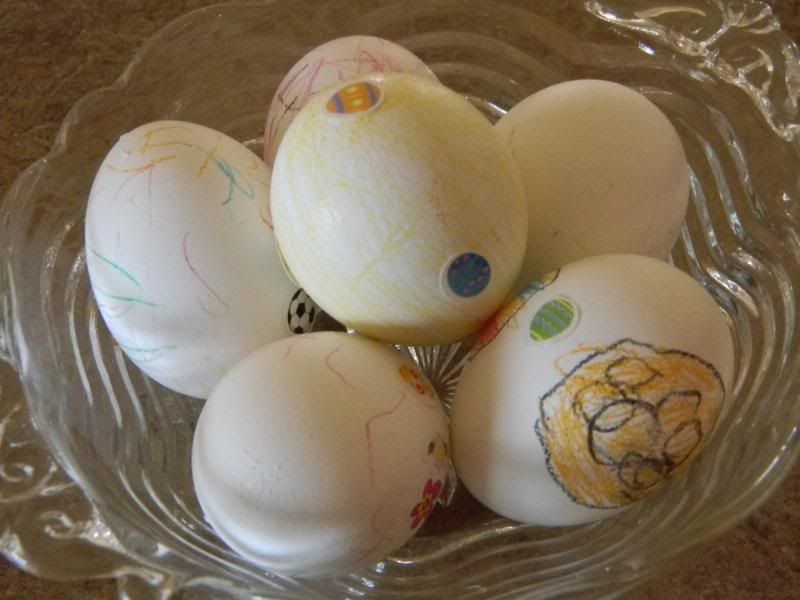
And while I was working on those cookies, the kids colored on and decorated the eggs. Yes, they are not dyed eggs. The kids each year want to make them, but I'm the only one that eats them here so I try to not make that many. I decided this year they will just color on them instead of messing with the dye mess! You know what, they had just as much fun this way too!


Once you have the cookies done make sure to place them on a pan in the freezer or you'll have a melted mess to clean up and a ruined dessert. Now if I was making these for just treats, I would wrap them in plastic wrap and place them in an air tight container in the freezer for another day.


After I had these in the freezer it was time to make up my side dishes. I made cheesy hash browns to go with from the recipe I posted here (just omit the ham, this will be a great recipe to use up some of that ham later on too!) And Campbell's green bean casserole using their recipe from here. Only we doubled it since it's Mr. Bacon's favorite.


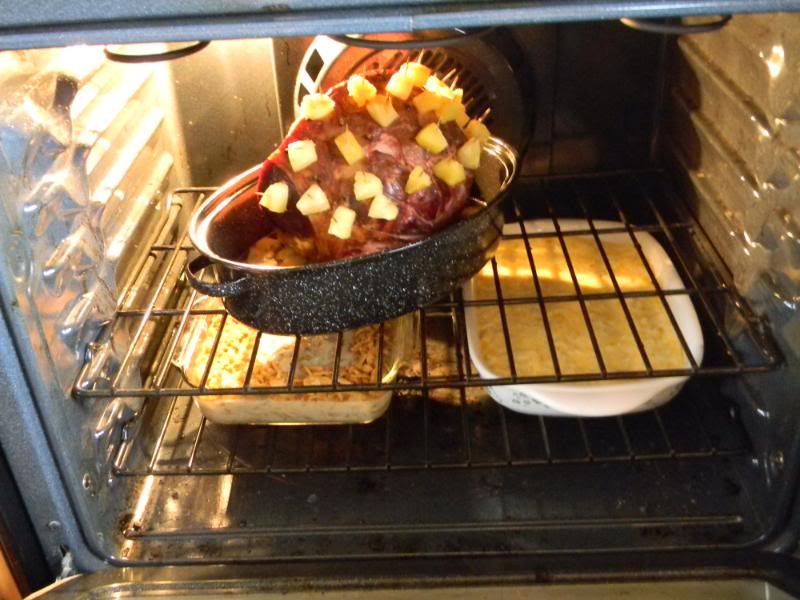
Here they are all happy in the oven together! Once the ham has finished baking, it's ready to carve. But first make sure you take out the pineapple and place it in a bowl to serve with dinner. Also make sure you take out the cloves, they are not meant to be eaten. This is why you counted out just how many you had in there, make sure you remember how many to remove!


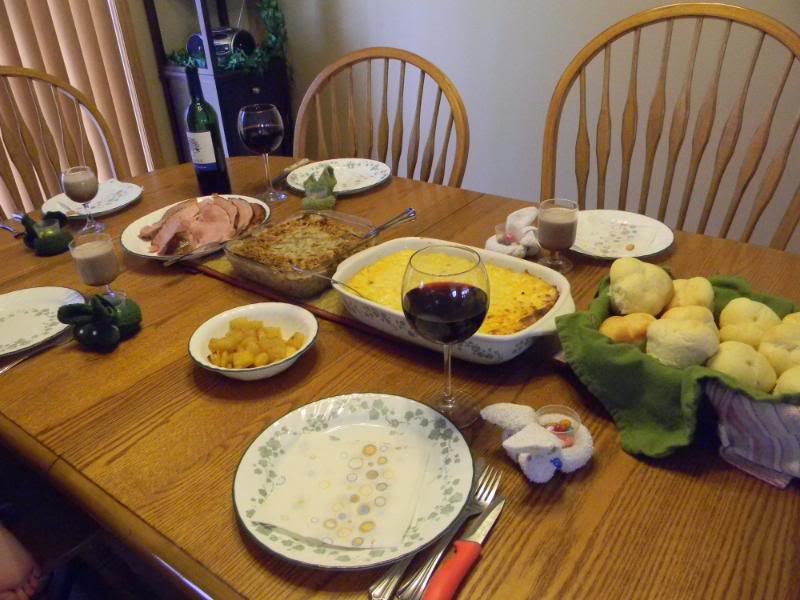
WHEW! That was a lot of work, I just prepared a whole holiday dinner in FOUR hours! The best part, tomorrow I can dig into the left overs too! But for now it's dinner time!

From the Bacon house, We hope you all have a very blessed and Happy Easter!

Friday, April 15, 2011

'TOP'ing O the Morning to ya!

Back when Mr. Bacon and I were dating I worked with a group of doctors, and every morning when one would arrive, he'd happily exclaim "Top O the Morning to ya" There is something about a happy person in the morning. I'm quite the morning person, Mr. Bacon would prefer to greet the morning sometime around noon! Whenever you get up, this next recipe is the perfect way to top your favorite morning treat!

I was walking though the grocery store the other day and came upon the granola. It looked so good. I had wanted some to top my yogurt. But seriously I couldn't get over the price. Sigh... so much for such a little bag. I looked at our budget and had to pass. When I was home, I thought, there had to be a recipe out there to make some granola cheaper than I can buy it. You know Ma Bacon, I had to go find it! It turned out amazing!

And I had to pass the recipe on to all of you to enjoy too! This is the perfect topping to yogurt, oatmeal, or even pour some milk over for a great breakfast! Best thing is just like so many of my recipes, you can customize it to your taste.


Homemade Granola

2 cups old fashioned rolled oats
1/2 cup wheat germ
1/2 cup chopped nuts
1/2 cup coconut
1/2 tsp cinnamon
3 tbsp oil
3 tbsp honey

Add in's up to 1/2 cup each:
Raisins
Dried cranberries
dried cherries
chocolate chips
bran flake cereal
sunflower seeds


Preheat oven to 300*Mix oatmeal, wheat germ, nuts, coconut, cinnamon and add in's in a bowl.


Mix honey and oil in separate bowl
(I found a whisk worked better than a spoon when it came to mixing these.)


Pour honey and oil mix over your other ingredients and combine well until everything is coated. Place on a large cookie sheet and bake 300* for 15 minutes, stirring it every 5 minutes. The granola will still be soft after the 15 minutes of baking. It will harden up a bit while it cools.


For my granola I add in 1/2 cup raisins, cherries and cranberries. I also use pecans for the nuts because they are my favorite and I had a bag sitting around looking lonely! I placed them in a baggie and smashed them with the back of my measuring cup to coarse chop them. Also since I added in so many extras I increased the honey and oil to 4 tbsp each. I have to say this is some of the best granola I've had. I had to finally hide the container in the cupboard because every time I walked by it I would sneak out another handful!
I hope you enjoy it as much as I do.

Monday, April 11, 2011

One lonely cookie


The other day I made Mr. Bacon's favorite cookies. Little boy Bacon and I were home all by ourselves (ok so Bacon bit was here too, but napping for once!) and we wanted a special project for just the two of us. All the kids love baking with me and even more when they can do it one on one. So we decided Daddy's favorite cookies were the thing to make, despite the lack of chocolate in them! I tried to remind myself that I needed to take a few pictures of them so everyone could see them. Guess what, I forgot! By the time I remembered to go back to take some pictures, this is what I found! One lonely cookie! So I ate it! But not without taking it's picture first. Can you guess what kind it is? Snickerdoodles! And by how fast they were gobbled up, you can bet they are good!

Mr. Bacon's Snickerdoodles:
1/2 cup butter
1/2 cup shortening (like crisco)
1.5 cups sugar
2 eggs
2 tsp vanilla
2 3/4 cup flour
2 tsp cream of tater powder
1 tsp baking soda
1/4 tsp salt
2 tbsp sugar
2tsp cinnamon

Heat your oven to 400*. In a bowl mix butter, shortening, sugar until mixed. Add in eggs and vanilla and mix again. Add in flour, cream of tater, baking soda, and salt and mix well. Shape the dough into 1-2" balls, I just take a tablespoon full and form it into a ball- no measuring for Ma Bacon!

Now comes the fun part for the kids, Combine the 2 tbsp sugar and 2 tsp cinnamon in a bowl. Place dough ball in the sugar mix and roll it around to completely cover it. Set the cookies on a baking sheet about 2" apart, they will spread a little. Bake for 8-9 minutes. Make sure not to over bake these, part of making snickerdoodles is making sure they are soft in the middle and not dry. As soon as you take the cookies out of the oven, move them to a cooling rack. This step is important. If you leave the cookies on the pan to cool they will continue to bake since the pan is hot making your cookies hard and dry.

Next step, ENJOY! These are wonderful dipped in your morning coffee too! Just don't let your kids (or mine!) know you are eating cookies for breakfast.

I also make a batch of chocolate chip cookies this past week. The same one's I blogged about here. I have to say they disappeared just as fast as the snickerdoodles. But I was smart with those, I only baked half the batch. The other half i put on a cookie sheet and they went right into the freezer. After a few hours I moved them into a container for another night. There is nothing better than fresh baked cookies and this way I can pull them out and pop them in the oven after I pull our dinner meal out and by the time dinner is over, fresh baked cookies!

Friday, April 1, 2011

Fooled Bacon kids... and a late night snack


April... where did you come from? I'm really thinking April fools day is just March laughing at us. Where did a fourth of the year go? So I want to know, did you fool anyone today? I did. There's never a dull moment in the bacon house. Yesterday I made my second batch of homemade yogurt (more on that later). I was preparing the kids lunch today when I got the idea. The kids were getting me all day, ok so I played along with their 'tricks' anyway. When it came to lunch I decided to fill their cups with my yummy yogurt! Straw and all. The kids got to the table and I heard the groans... "aawww... Milk today?!" And then Bacon Jr. took a drink. It was priceless! Nothing better than a harmless good fun prank right?! Everyone had a good laugh at my yogurt milk. And though it tasted awesome just as it, who can leave good yogurt alone? Especially some kids. The add in treat today was cut up strawberries and a spoon full of mini chocolate chips mixed in. It was a great treat to lunch.


So how did my second go around with homemade yogurt turn out? AMAZING! For those trying it out, here is what I did different. This time I used 1% milk instead of skim, after that I followed all the same steps though cooling the milk. This time I used Danon natural plain yogurt for my 6oz of starter. I mixed it in well and then added just over 1 cup (between 1 & 1.25 cups) sugar since my starter was plain and not vanilla. I added 2 TBSP vanilla extract too. Mixed all that in really well and placed it in my jars. This time I prepped the 4 quart jars and 1 pint jar too since last time I had to dump out the extra I had. It filled all the jars up perfectly with no waste this time. Off to the cooler they went. I filled the cooler with hot water (about 120*) all the way up to the top of the quart jars (yes over the top of the pint) and let them sit for 4.5 hours. Then they went straight to the fridge with no checking them. At bedtime I peeked on them, or about 6hrs in the fridge. Perfect consistency and tasting yogurt. We couldn't be happier, and between all of us, we went though a quart of yogurt today alone! You know it's good if they request seconds!

So now on to that snack I mentioned. I'm sitting at home alone tonight, Mr. Bacon is off working hard to fill our pockets and the kids are in bed and I get the munchies. Digging though the cupboards I have decided the only thing that sounds good is popcorn. But really, I didn't want to dig out the old air popper, and we were out of the package of microwave stuff, OH the dilemma. What to do? Make your own homemade microwave popcorn! You don't need much to make it, it tastes so good, and it's healthy for you.


What you need:
1/4 cup Popcorn seeds
1 TBSP oil
1/2 tsp salt
lunch size paper bag


Mix your seeds with oil and salt, Place them in the bottom of the paper bag. Fold over the bag twice and set it in your microwave. You don't need to lay it down (you can if you want), I just squish it a little to make it fit. Set it for 2-3 minutes and let the popping start! Make sure you stay near, once you hear the popping slow or stop for a sec or two, it's time to take it out before it burns.


See, Yummy popcorn! Dump it out into a bowl and you're ready to go. I do like my popcorn just plain sometimes, but others I love to drizzle some melted butter and even a little mac n cheese powder to the top!


This is a great treat you can make with the kids too. Our kids love helping mix the seeds and dump them in their own bags. Perfect for movie night!